


Using SCIM With Ideanote
Using SCIM With Ideanote
Note: This guide is intended for Workspace owners
SCIM (System for Cross-domain Identity Management) is an open standard that allows for the automation of user provisioning between software systems, such as between your IT-infrastructure and the Ideanote platform. It enables you to create, update, disable, and delete users and teams from within your own system, such as from a Microsoft Entra ID/Azure AD application you've set up internally for usage with Ideanote.
With SCIM, you can prepare all of your users, teams, and their memberships within these teams, from within your own system, such that everything is synced with Ideanote and ready for when you want to launch a campaign, - without you having to ask your users to join the platform in advance.
If you combine SCIM with SAML- or OIDC-based authentication, both user provisioning and user authentication is fully driven by your own IT-infrastructure.
Ideanote is fully compliant with the SCIM standard, and supports all required as well as many of the optional SCIM attributes for both Users and Groups. All of these are discoverable via our public API via standardized endpoints, as well as directly from within the Ideanote platform.
This guide will help you get started with SCIM on Ideanote as easily as possible.
We'll be using Microsoft Entra ID (formerly known as Azure Active Directory) and Okta for the examples in this guide, but the principles should apply to any identity provider that is SCIM-compliant.
Using SCIM With Ideanote and Entra ID
1. First, go to your Ideanote Workspace.
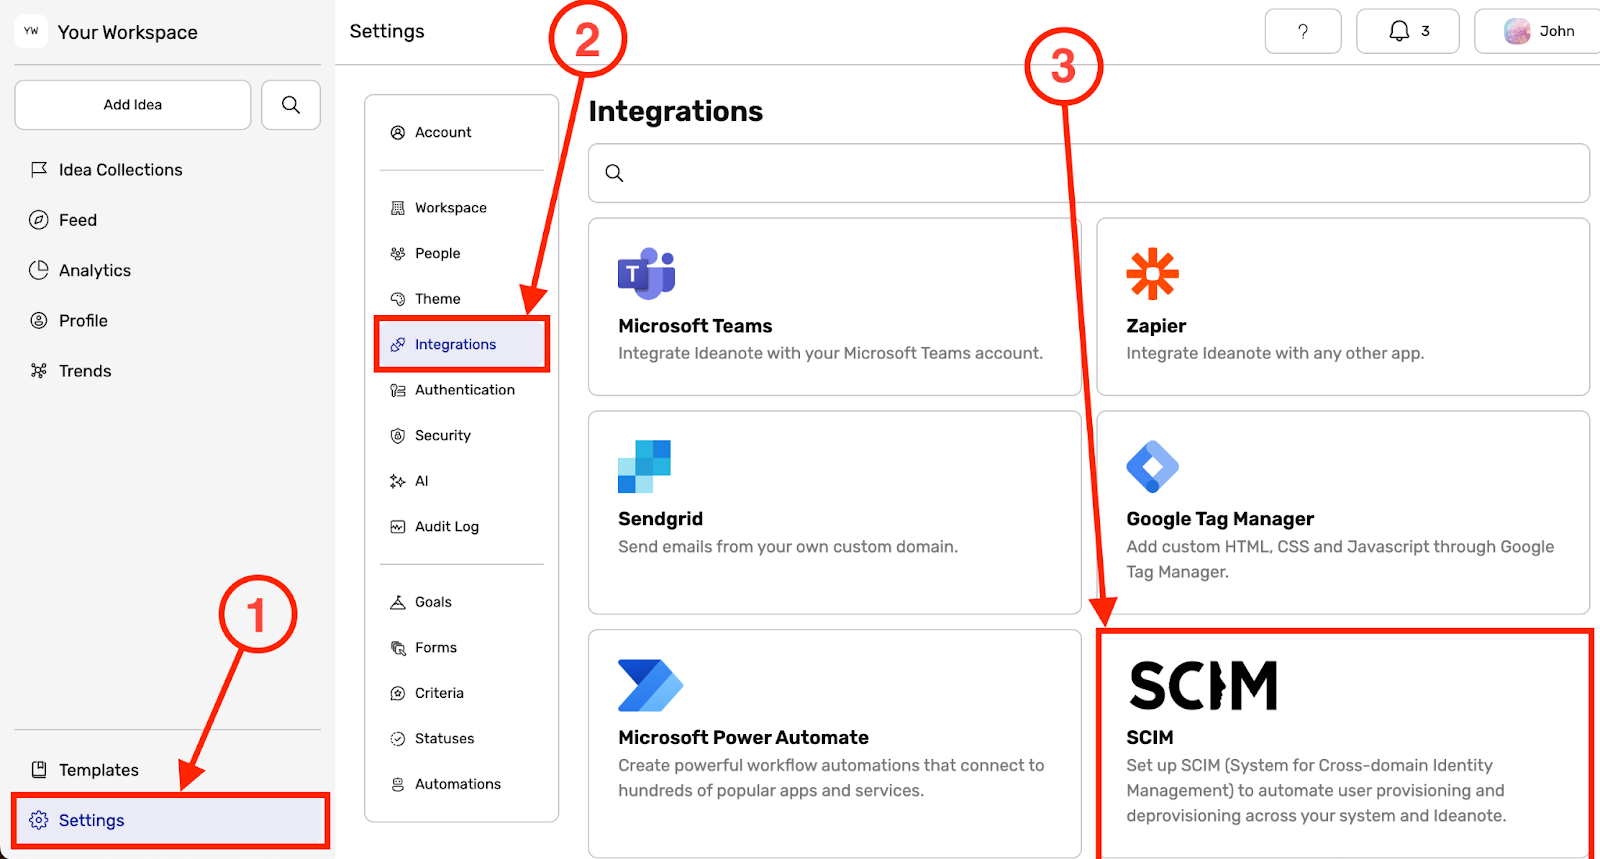
1.1. Click 'Settings' in the main sidebar
1.2. Click 'Integrations'
1.3. Click 'SCIM'
2. A dialog window will now appear on your screen with information relating to your SCIM configuration. It is immediately ready to be used.
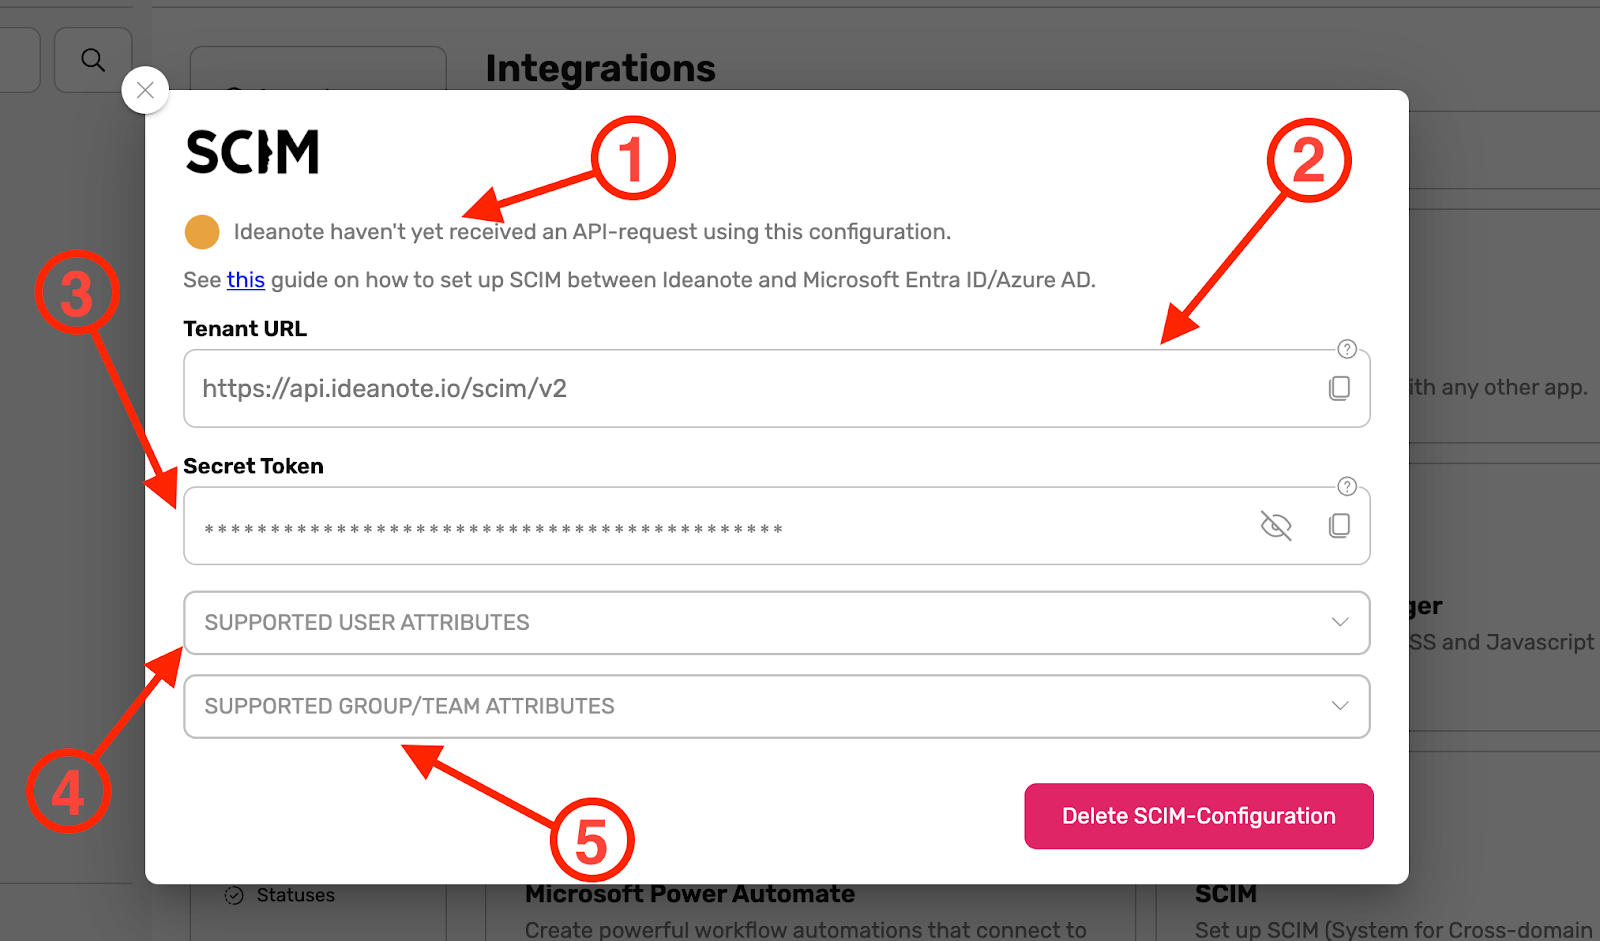
2.1. In the top of the dialog, you will be able to see whether or not Ideanote has received an API-request using this configuration yet (See 1 in the image above).
2.1.1. When everything is set up correctly and an API request has been received, the text and the color of the indicator will be different, as seen in the image below:
{IMAGE: SCIM status indicator showing green status with text "Ideanote received an API-request using this configuration at 03/22/2024, 12:25 AM."}
2.2. The 'Tenant URL' is the root of Ideanote's SCIM endpoints. You will need to add this to the application you will set up for Ideanote in your identity provider later.
2.3. The 'Secret Token' is the token needed to authenticate calls to Ideanote's SCIM endpoints. You will need to add this to the application will set up for Ideanote in your identity provider later.
2.4. The 'Supported User Attributes' accordion menu expands into a table of all the SCIM attributes Ideanote supports for SCIM Users, including our own schema extensions. This data comes directly from our API on runtime and is therefore always 100% up-to-date.
2.5. The 'Supported Group Attributes' accordion menu expands into a table of all the SCIM attributes Ideanote supports for SCIM Groups. As described in step 2.4, this data is always 100% up-to-date.
2.6. Note: If you want to delete a SCIM configuration, click 'Delete SCIM-Configuration'.
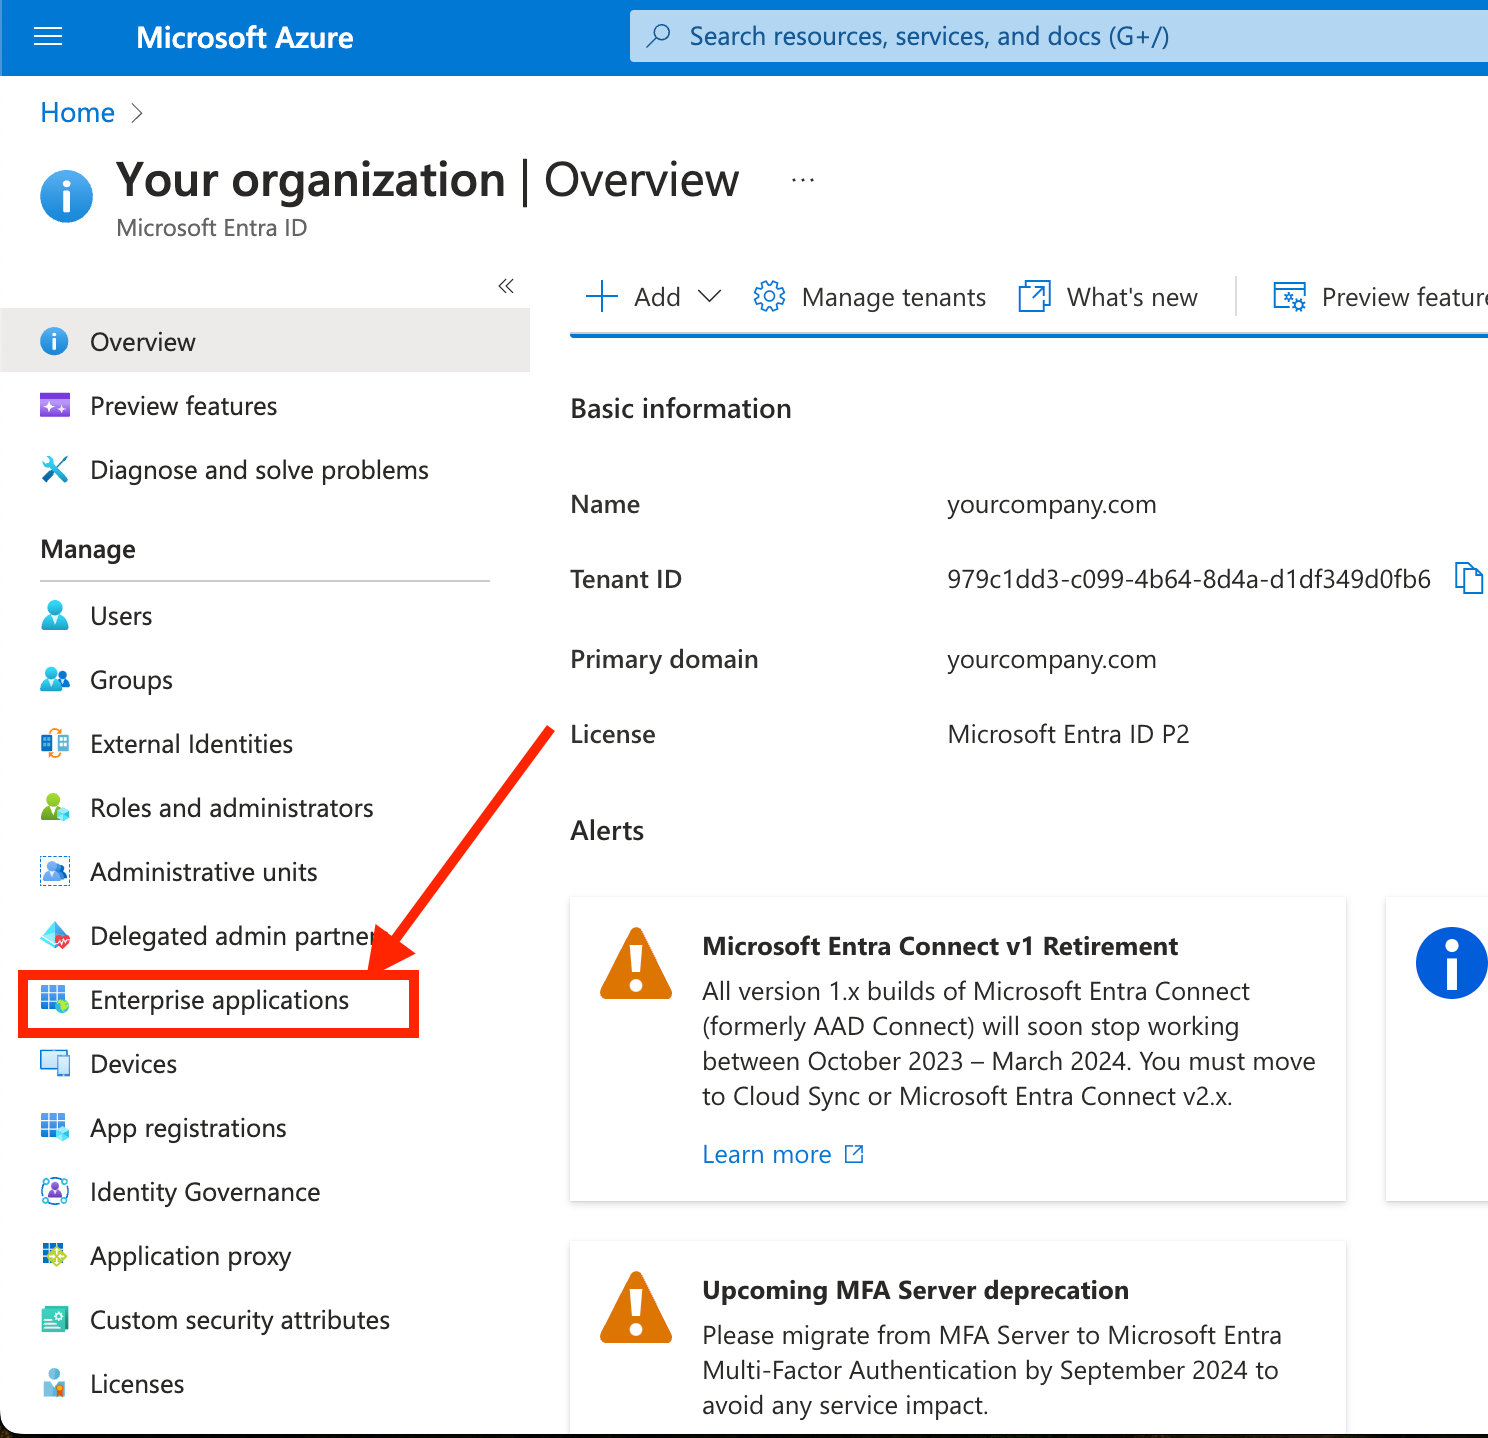
3. You've now set your Workspace up for SCIM. Next, go to the place from which you manage the users and/or IT-infrastructure in your organization, such as Microsoft Entra ID.
4. From Microsoft Entra ID, or from the Azure Portal, click on 'Enterprise applications'.
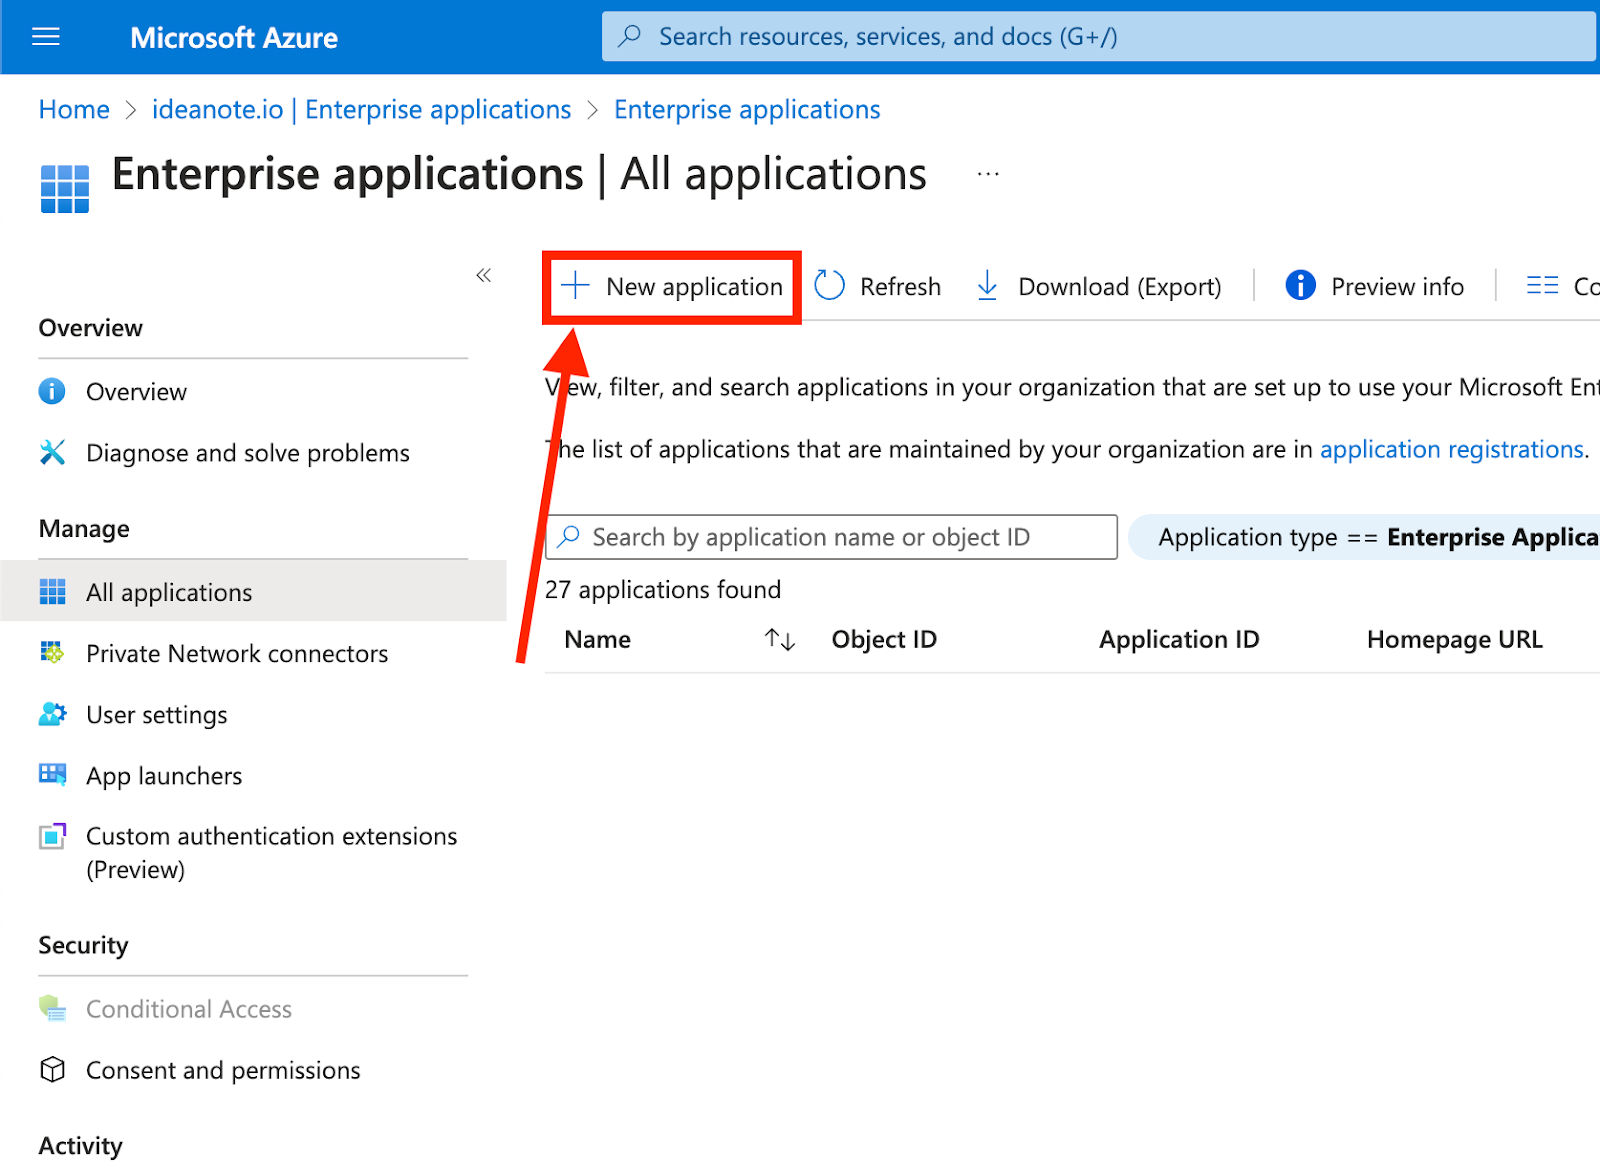
5. If you have already created an Enterprise application for Ideanote in the past, such as for SAML-/OIDC-based authentication, find it in the list, click on it, and go directly to step 7. Otherwise, click 'New application'.
6. You'll now be taken to a gallery of existing apps, but will be creating a new one:

6.1. Click 'Create your own application'
6.2. Under 'What's the name of your app?', give it a fitting name, such as 'Ideanote SCIM provisioning'.
6.3. Under 'What are you looking to do with your application', select 'Integrate any other application you don't find in the gallery (Non-gallery)'.
6.4. Click 'Create' to proceed. You will now be taken to your new Enterprise application.
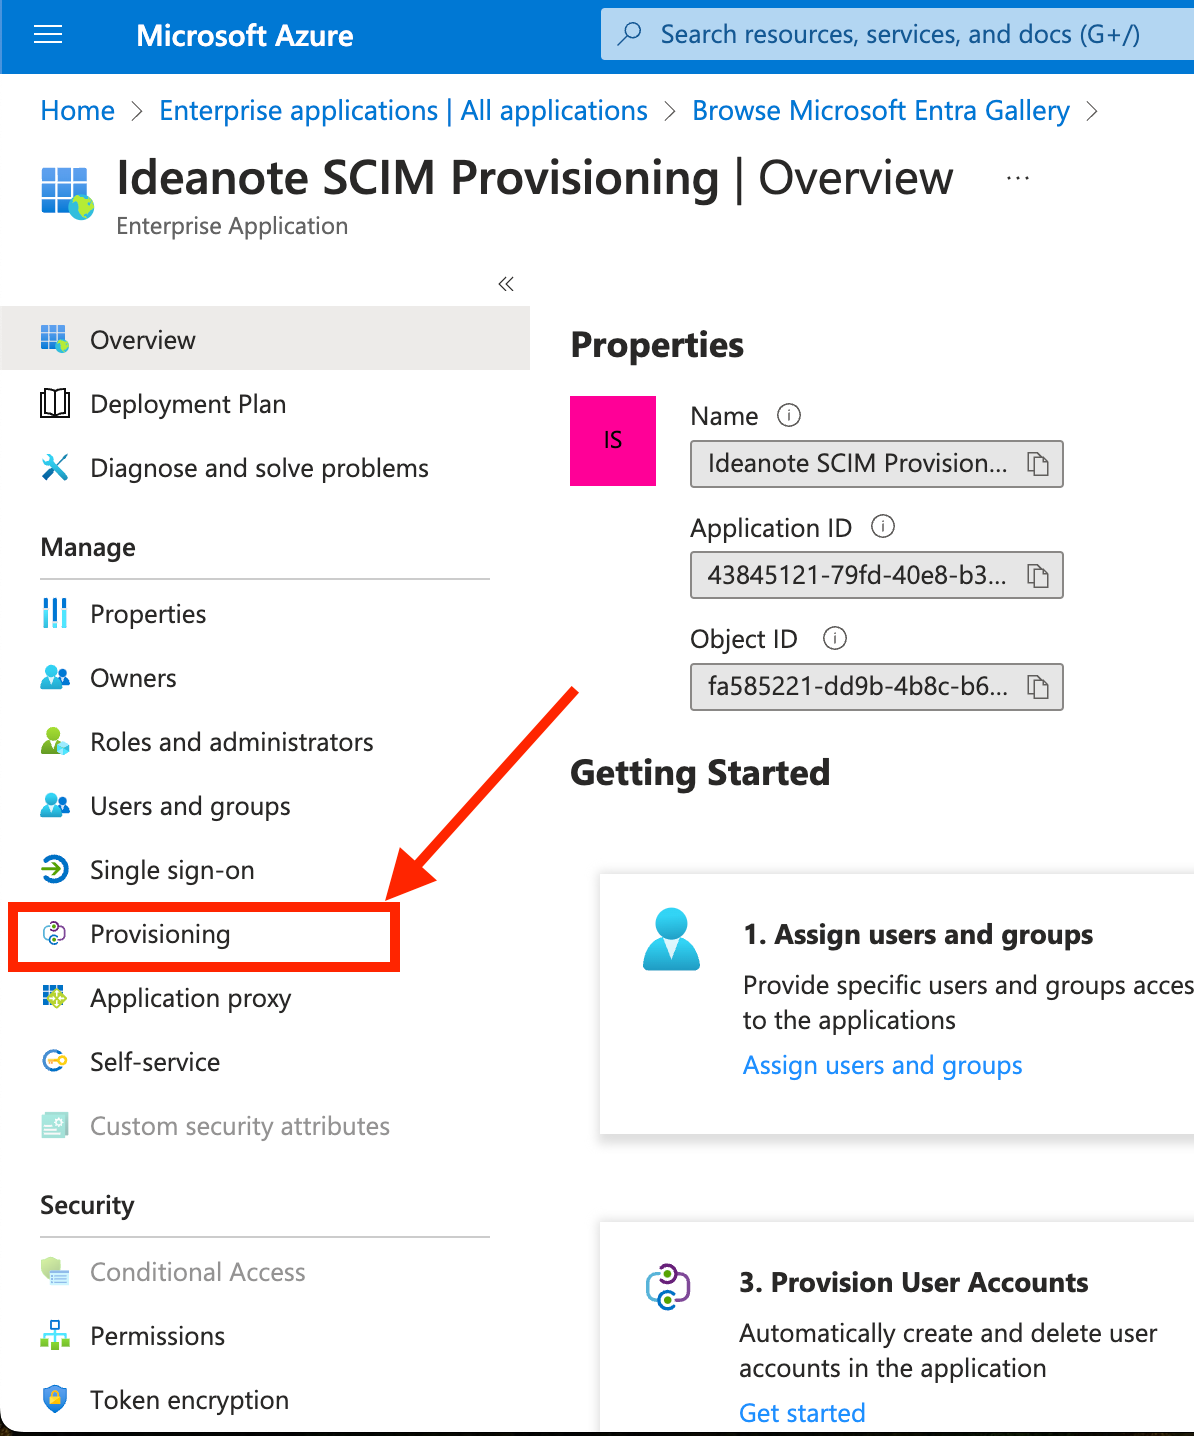
7. From your application, click 'Provisioning' in the sidebar under 'Manage'
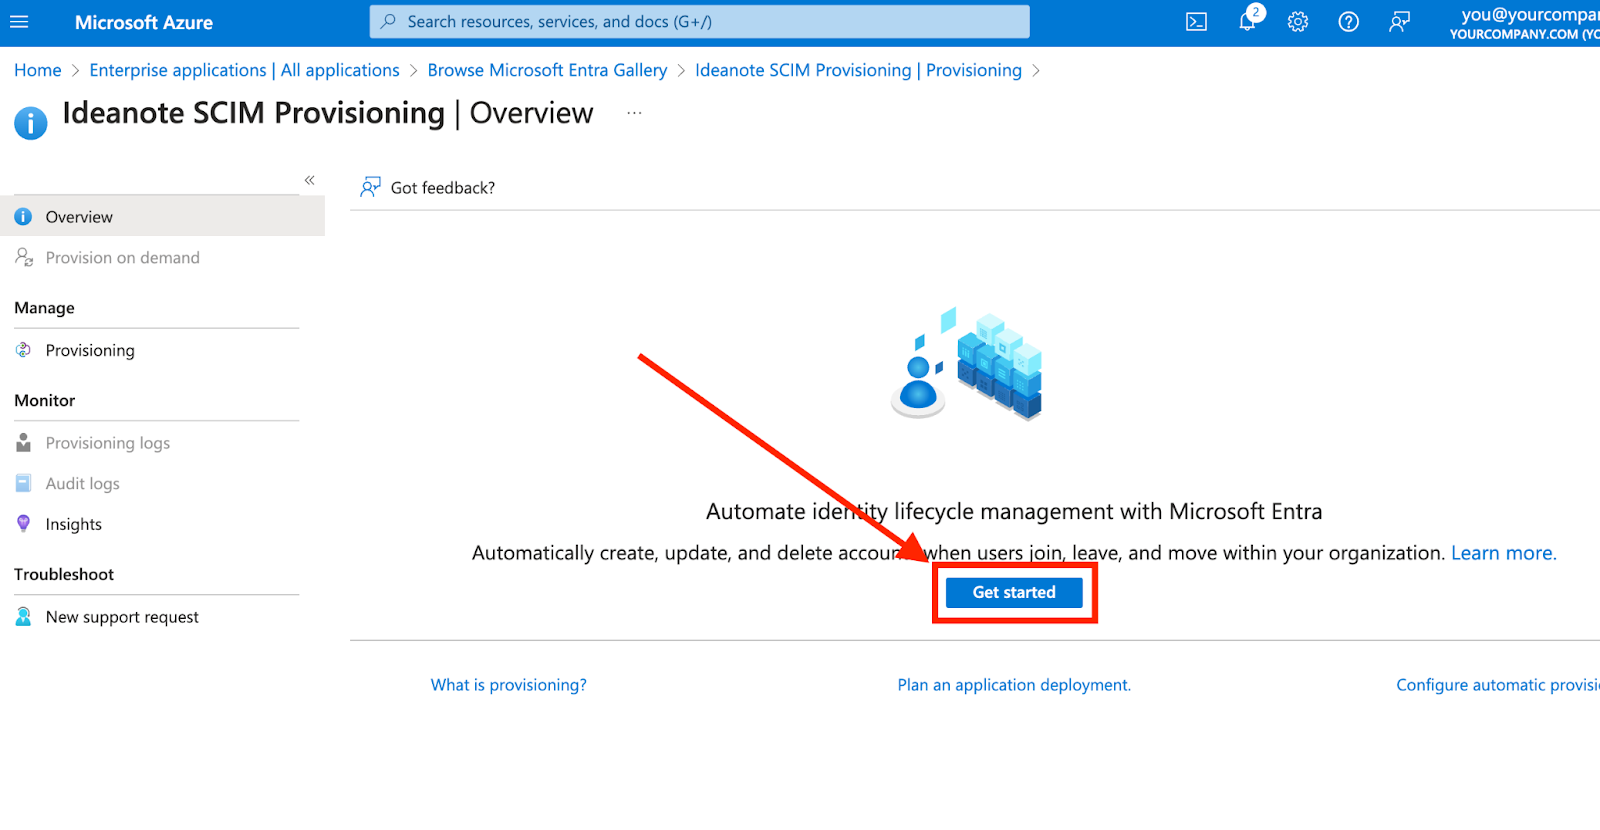
8. Click 'Get started'
9. We now have to connect the information from the SCIM configuration you've set up on your Ideanote workspace to your Enterprise application:
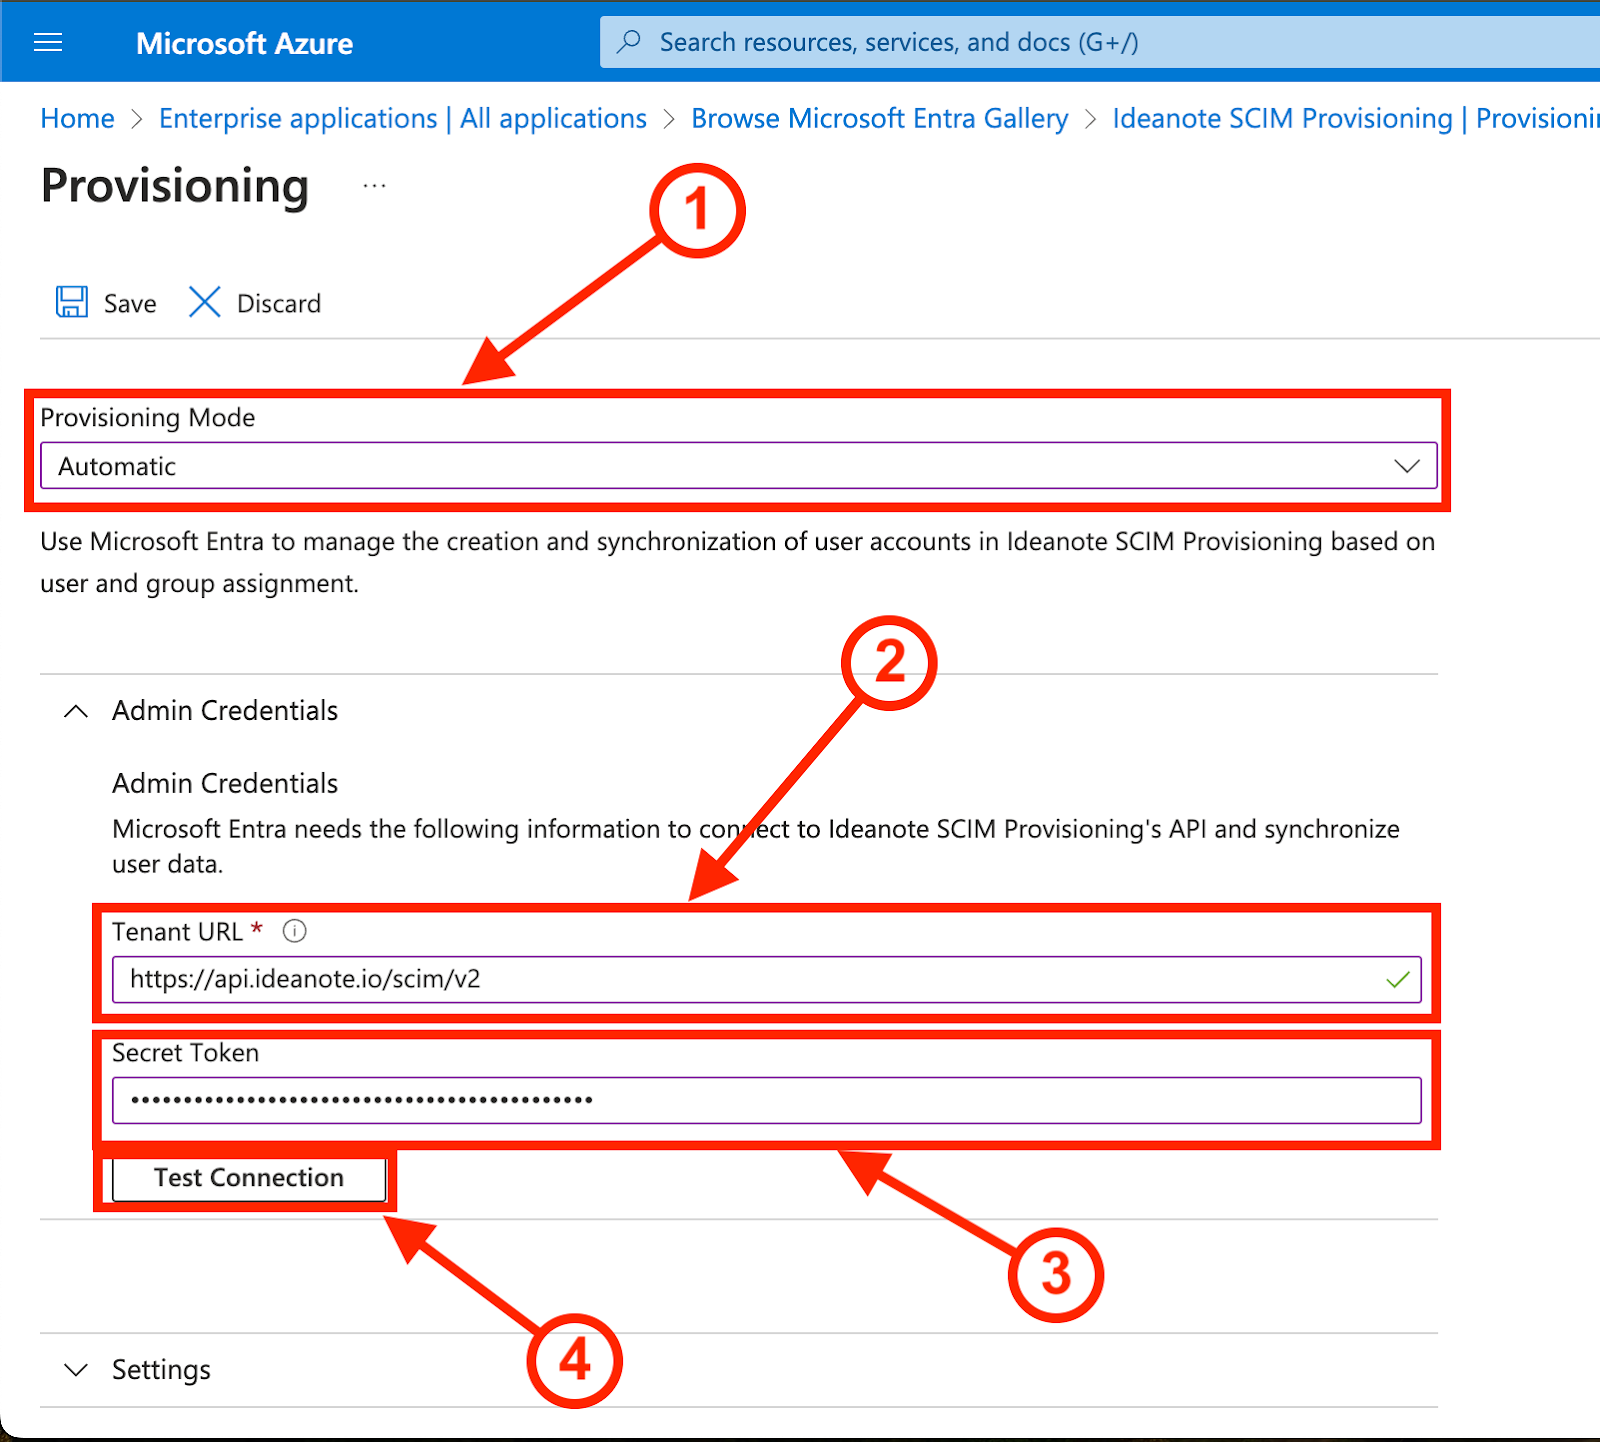
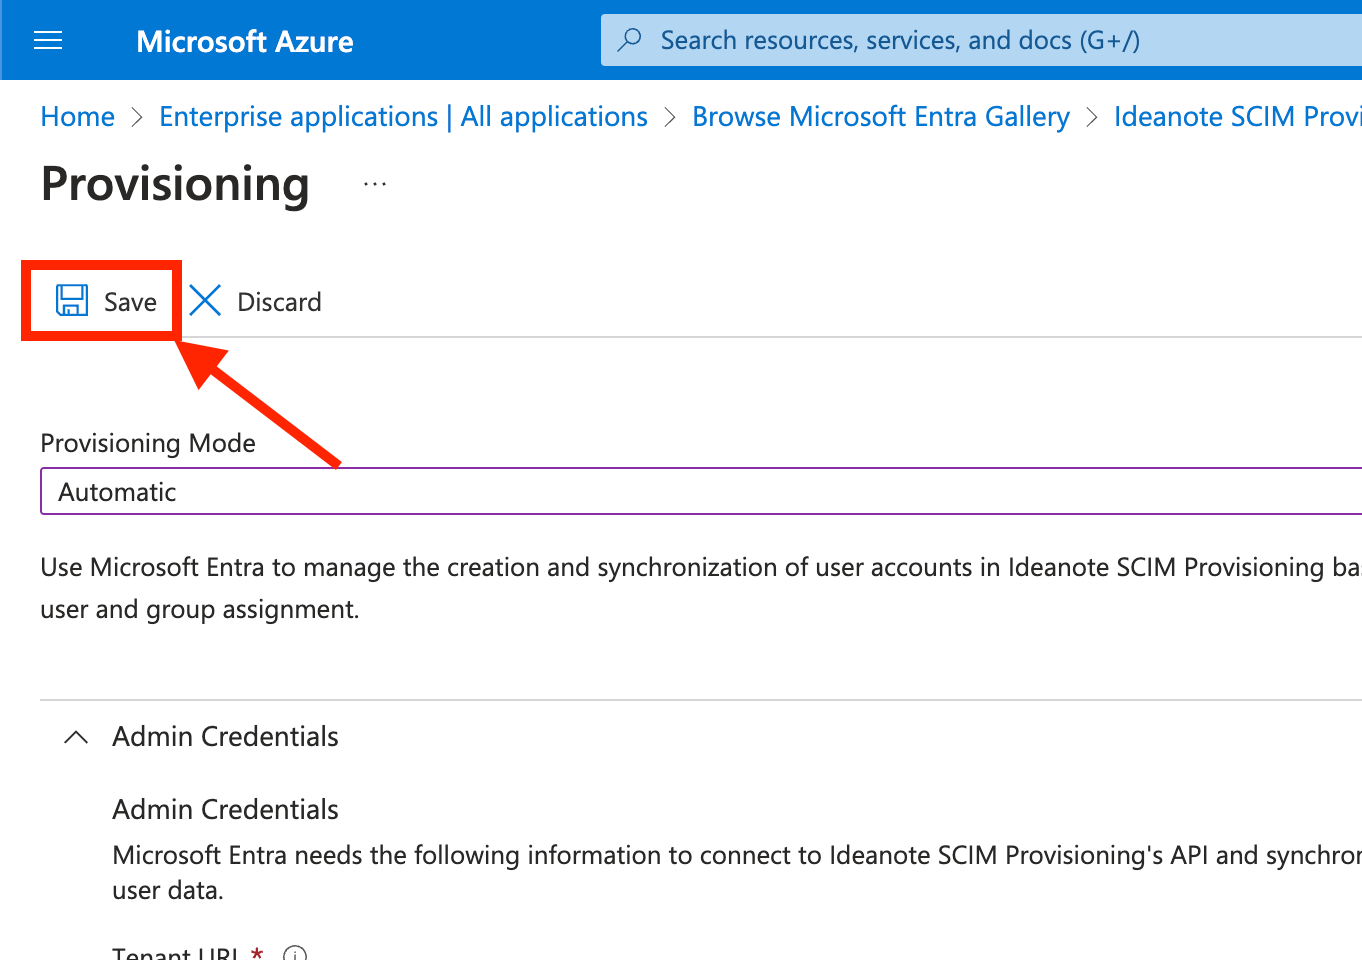
9.1. Under 'Provisioning Mode', change to 'Automatic'. "Admin Credentials" will now appear below it. Make sure it is expanded.
9.2. Under 'Tenant URL', insert the URL you received in step 2.2 in the SCIM Integration dialog on your Ideanote Workspace.
9.3. Under 'Secret Token', insert the token you received in step 2.3 in the SCIM Integration dialog on your Ideanote Workspace.
9.4. Finally, click 'Test Connection' to ensure that it is working correctly.
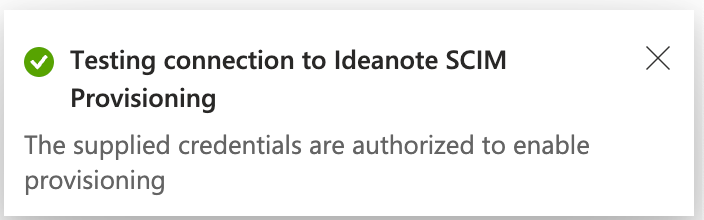
9.4.1. If everything goes correctly, you should see the following message.
9.4.2. You should now also be able to see on the SCIM configuration in your Ideanote workspace that the text and color of the indicator described in step 2.1 has changed into something like seen on the following image:

9.5. Click 'Save' to save the credentials.
9.6. Now you should review and potentially customize how your user- and group data is mapped to corresponding SCIM attributes:
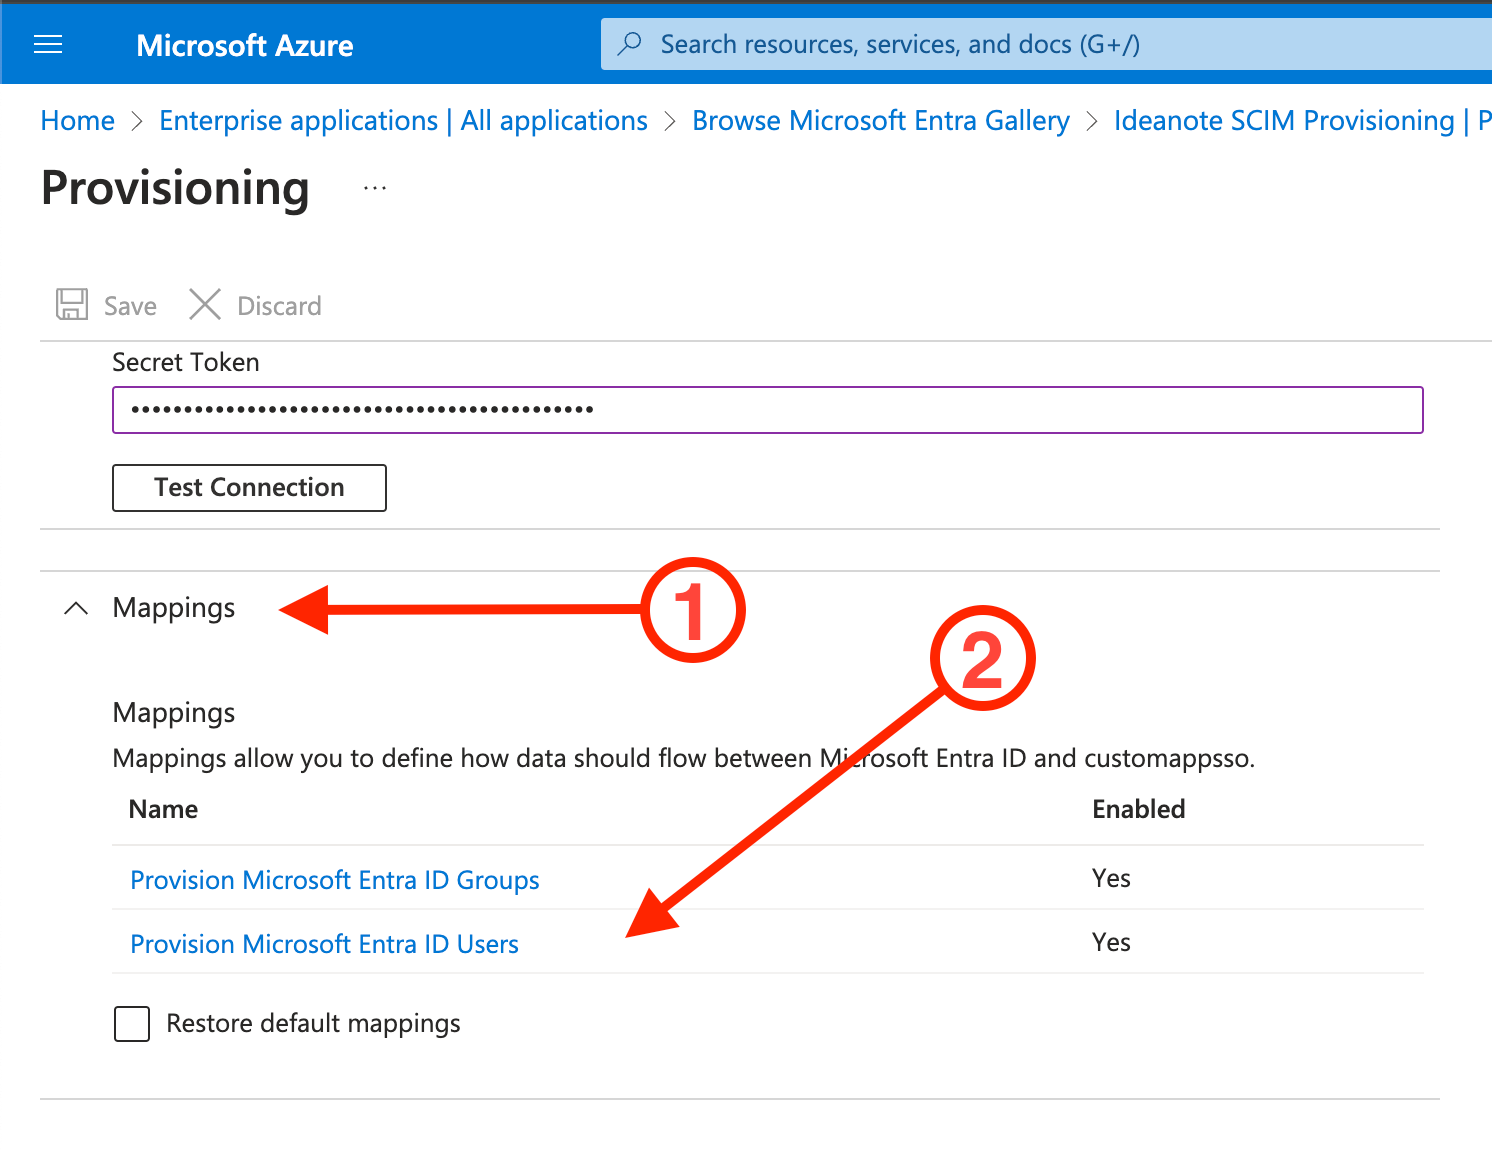
9.6.1. Make sure the 'Mappings' accordion menu is expanded
9.6.2. Click in 'Provision Microsoft Entra ID Users'
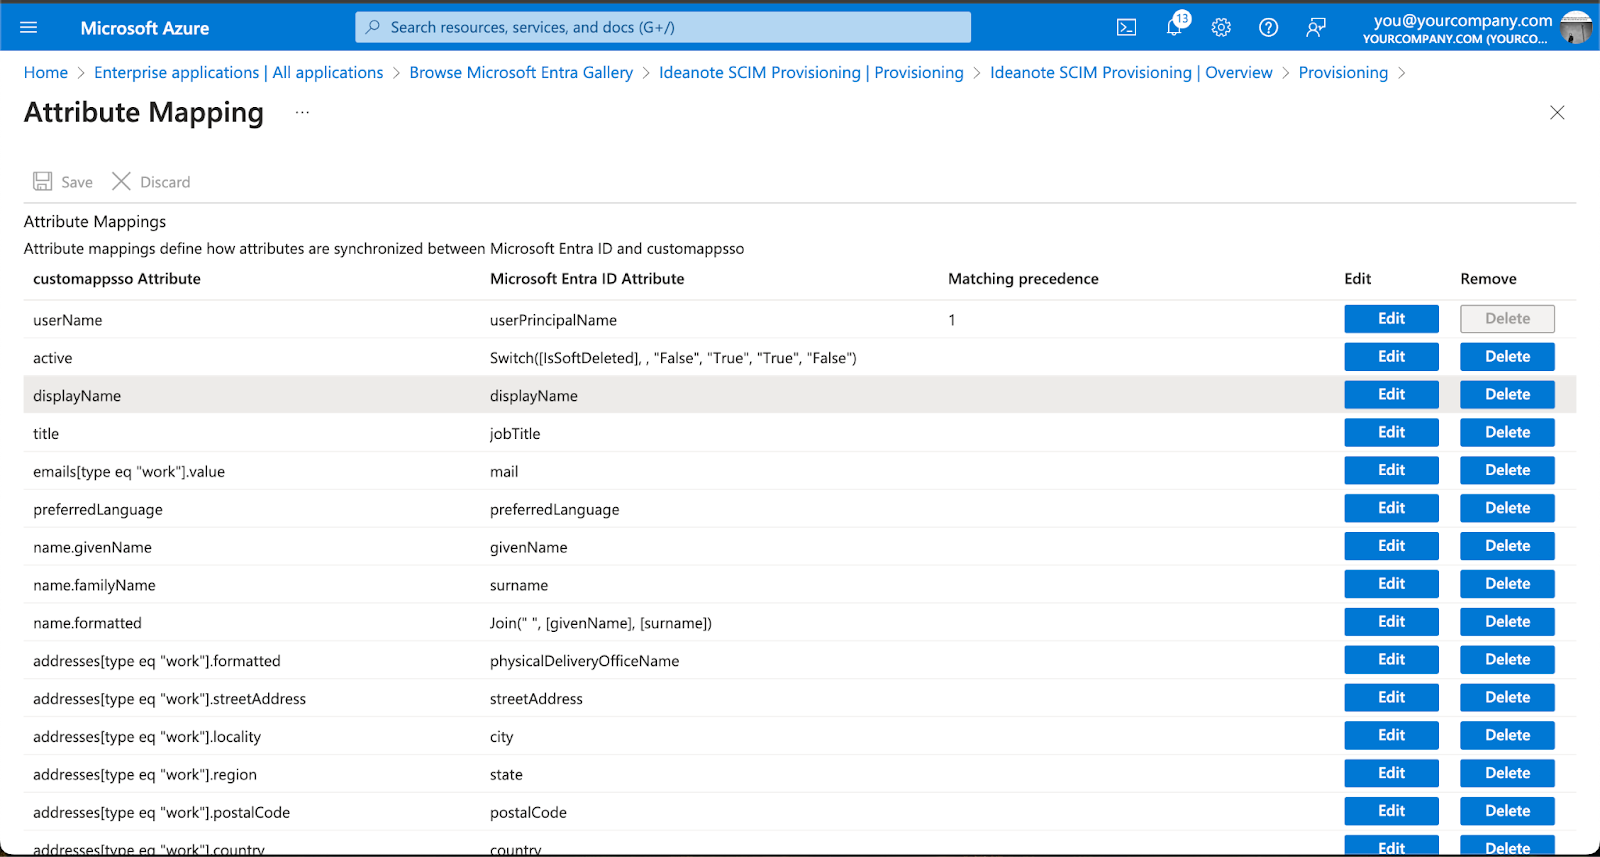
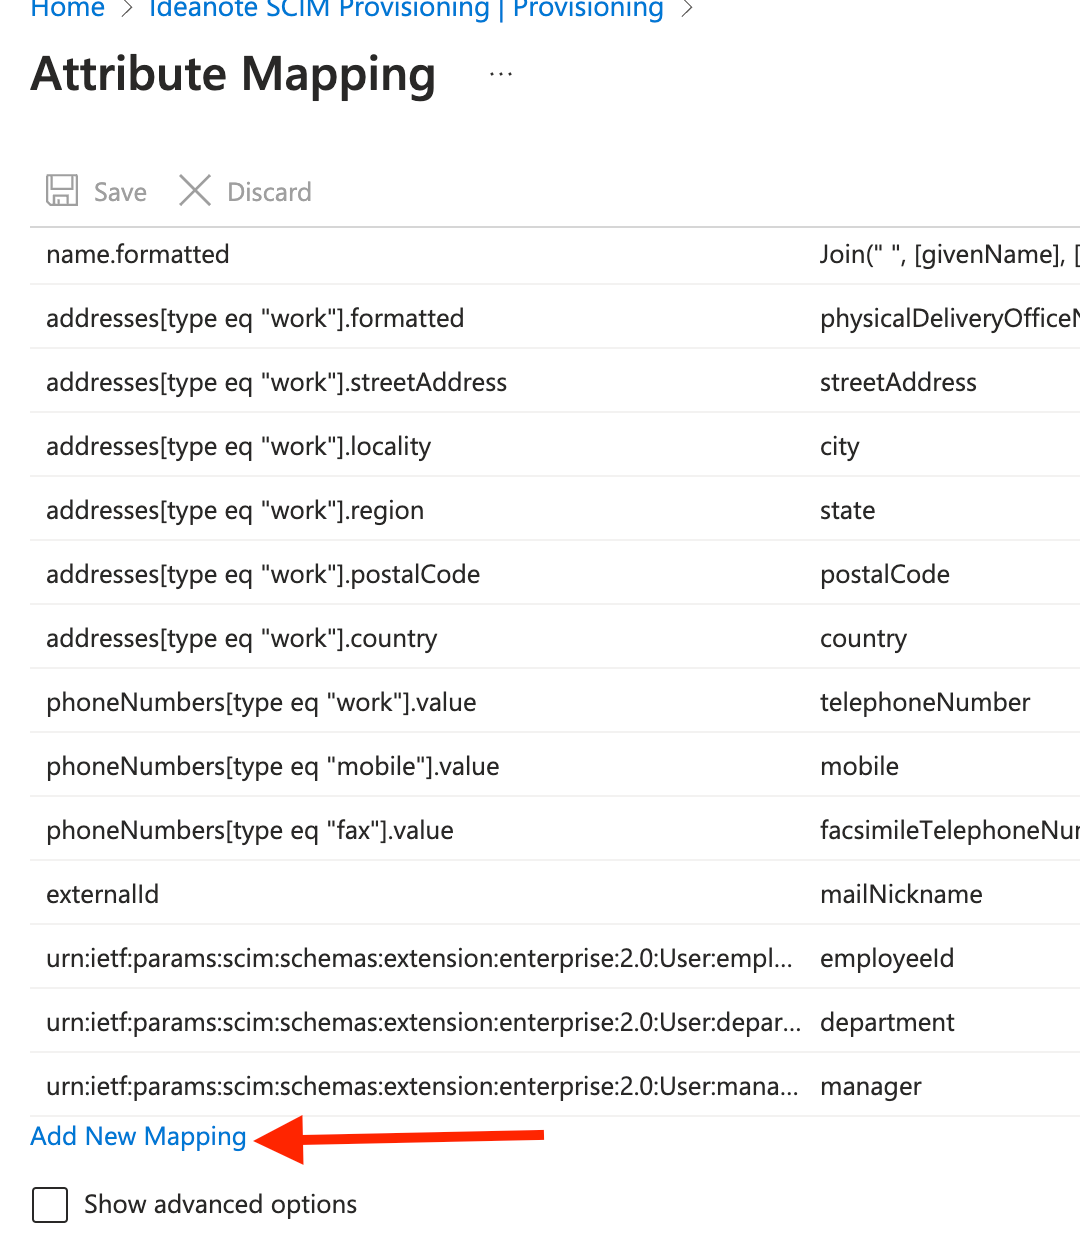
9.7. You'll now be taken to 'Attribute Mapping'. Azure comes with default mappings that work out of the box, but you are free to customize this as you want. For example, you might want to map the specific roles you assign to your users inside Entra ID to equivalent Ideanote ranks, and/or you might want to map something else than mailNickname to externalId, such as the userPrincipalName. You can use the table of 'Supported User Attributes' outlined in step 2.4 to get an overview of the User attributes Ideanote supports.
9.7.1. If you to map to one of Ideanote's User schema extension attributes, such as teamPath, you need to add it to the attribute list of the Enterprise application:
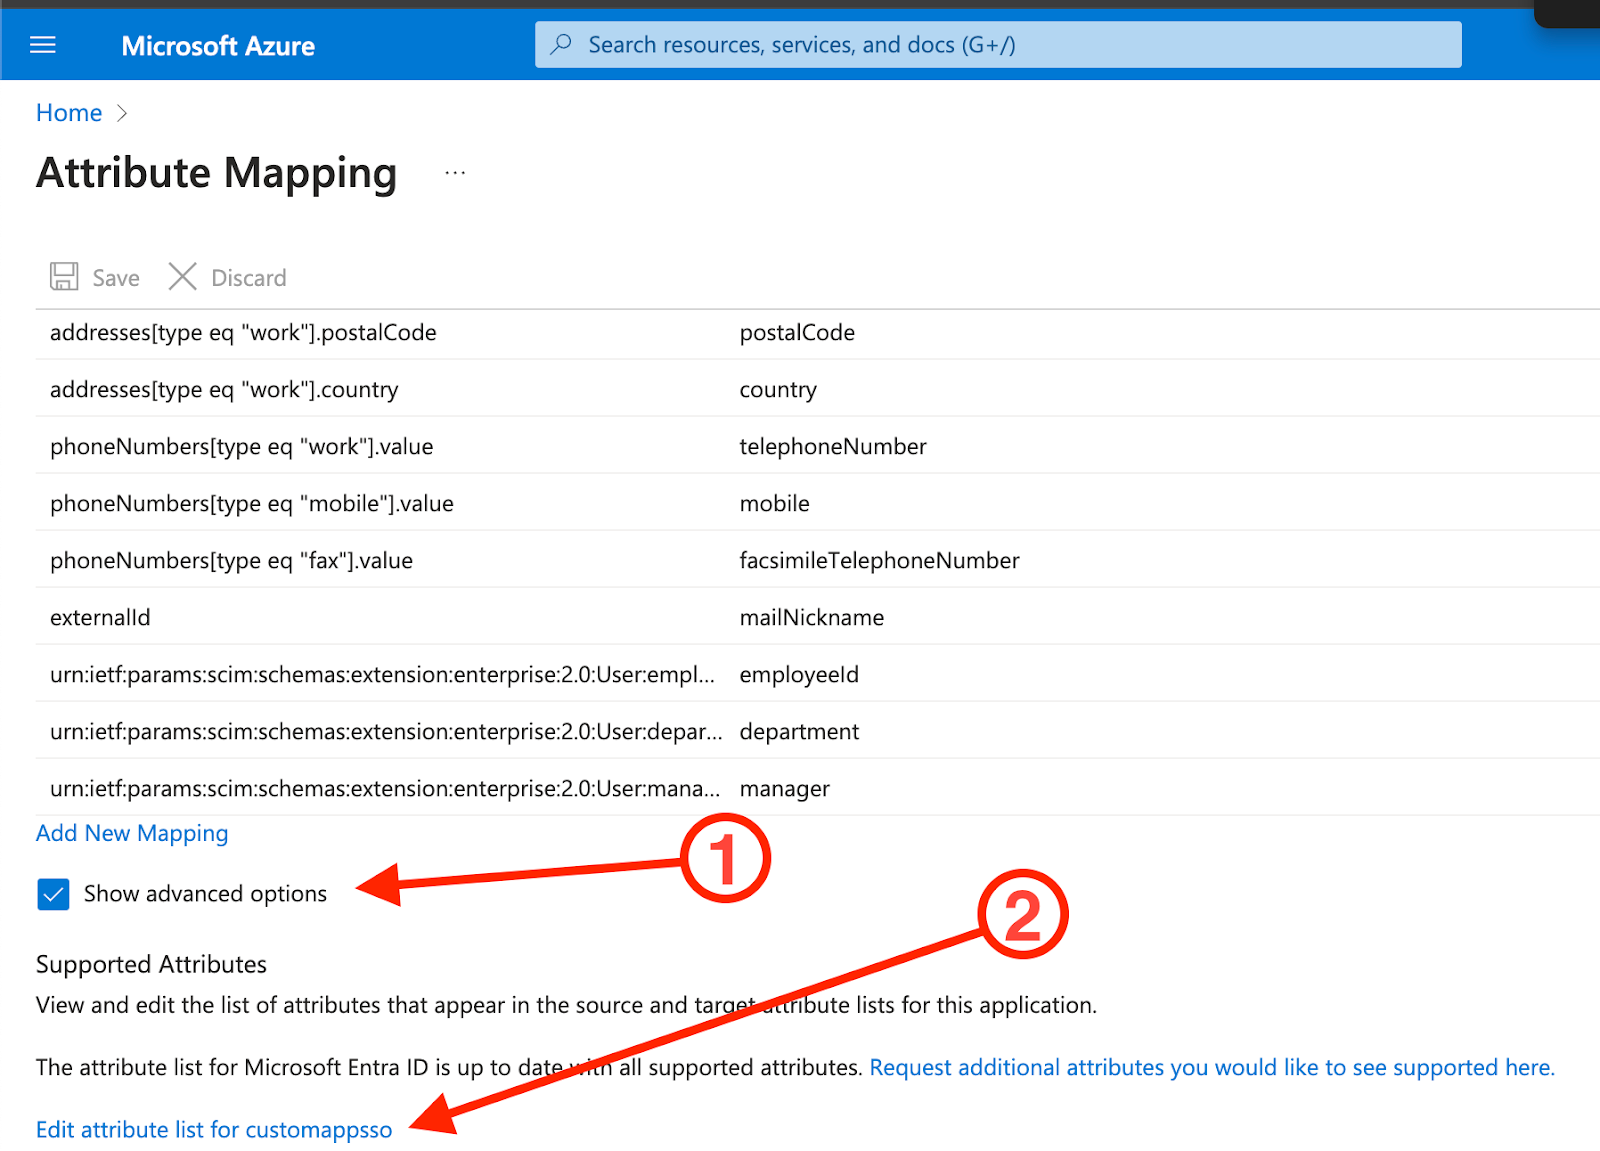
9.7.1.1. Make sure 'Show advanced options' is checked
9.7.1.2. Click 'Edit attribute list for customappsso' (or whatever the app is called)
9.7.1.3. Scroll down and type in the name of the attribute you want to map to, such as urn:ietf:params:scim:schemas:extension:ideanote:2.0:User:teamPath
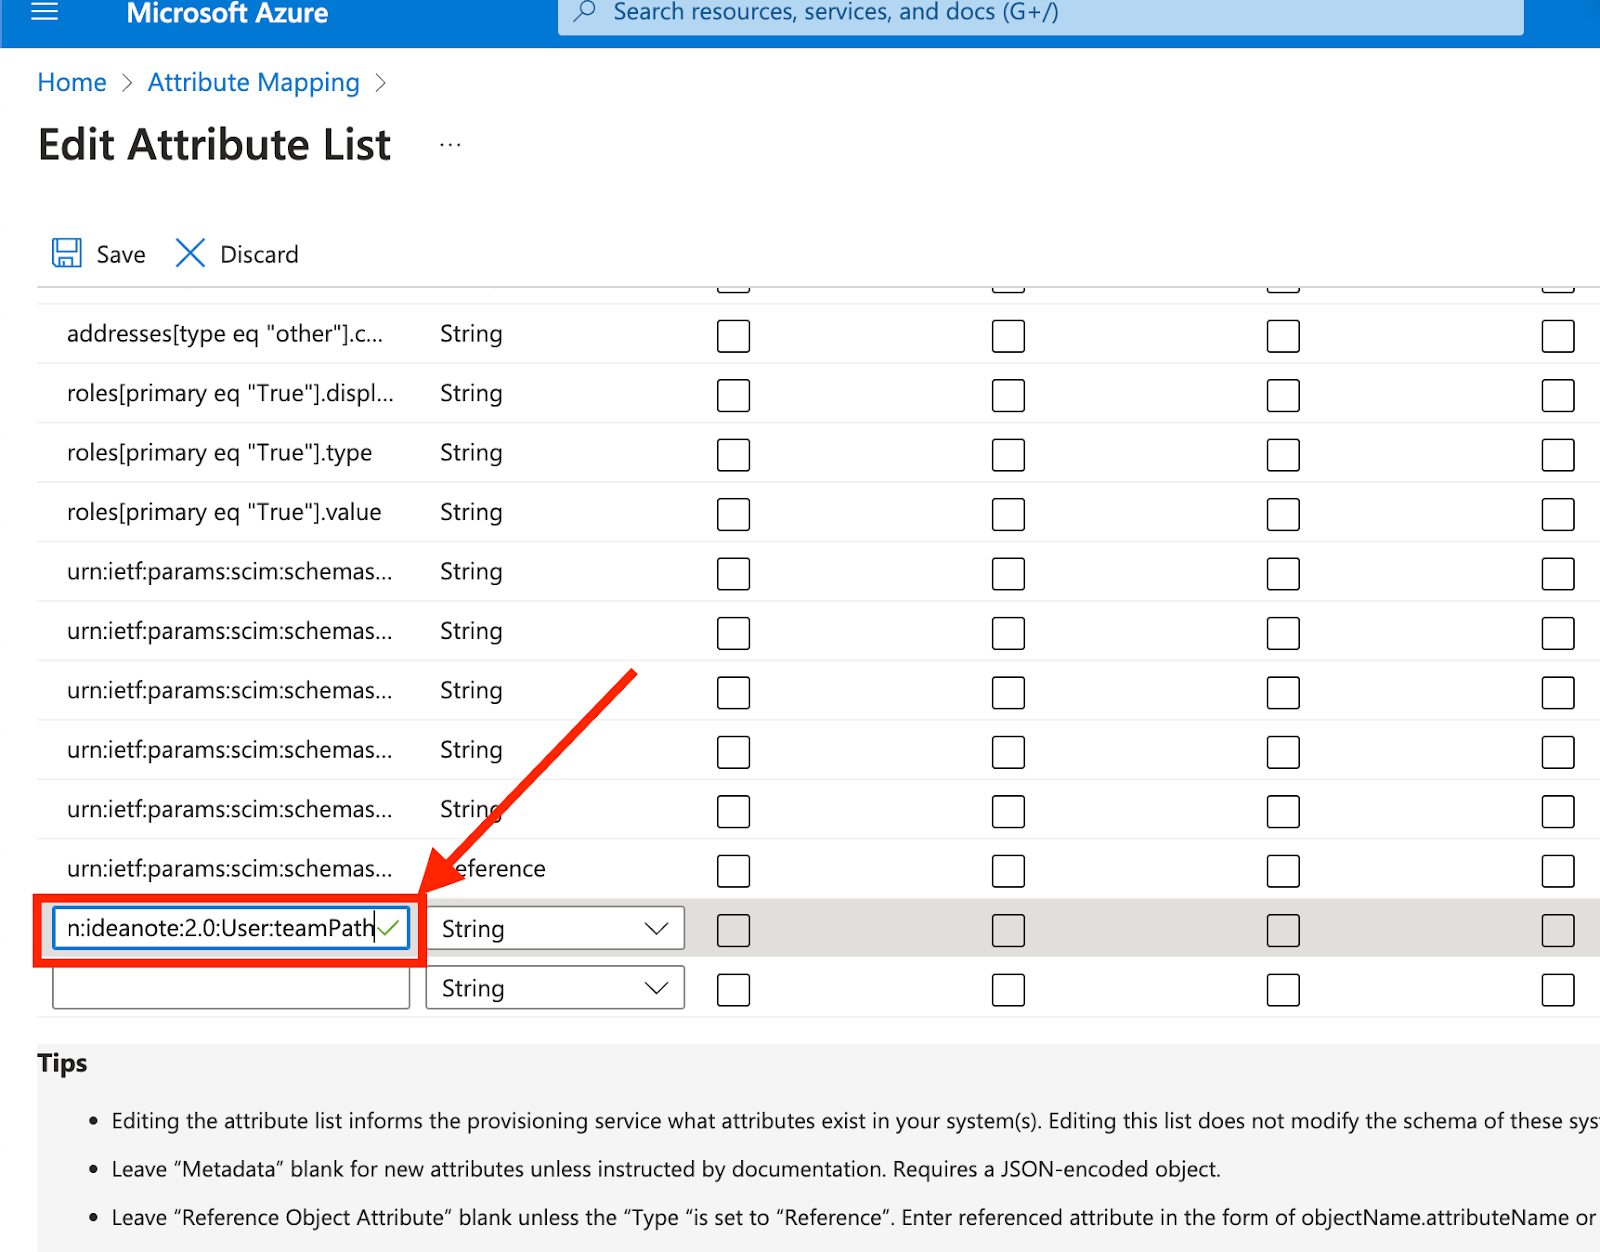
9.7.1.4. Click 'Save' to commit your changes
9.7.2. If you want to add an additional mapping, click 'Add new mapping'. You can see Microsoft's full documentation on Attribute Mapping here.
9.8. You're now ready to add the Users and Groups you want to associate with Ideanote and provision with SCIM.
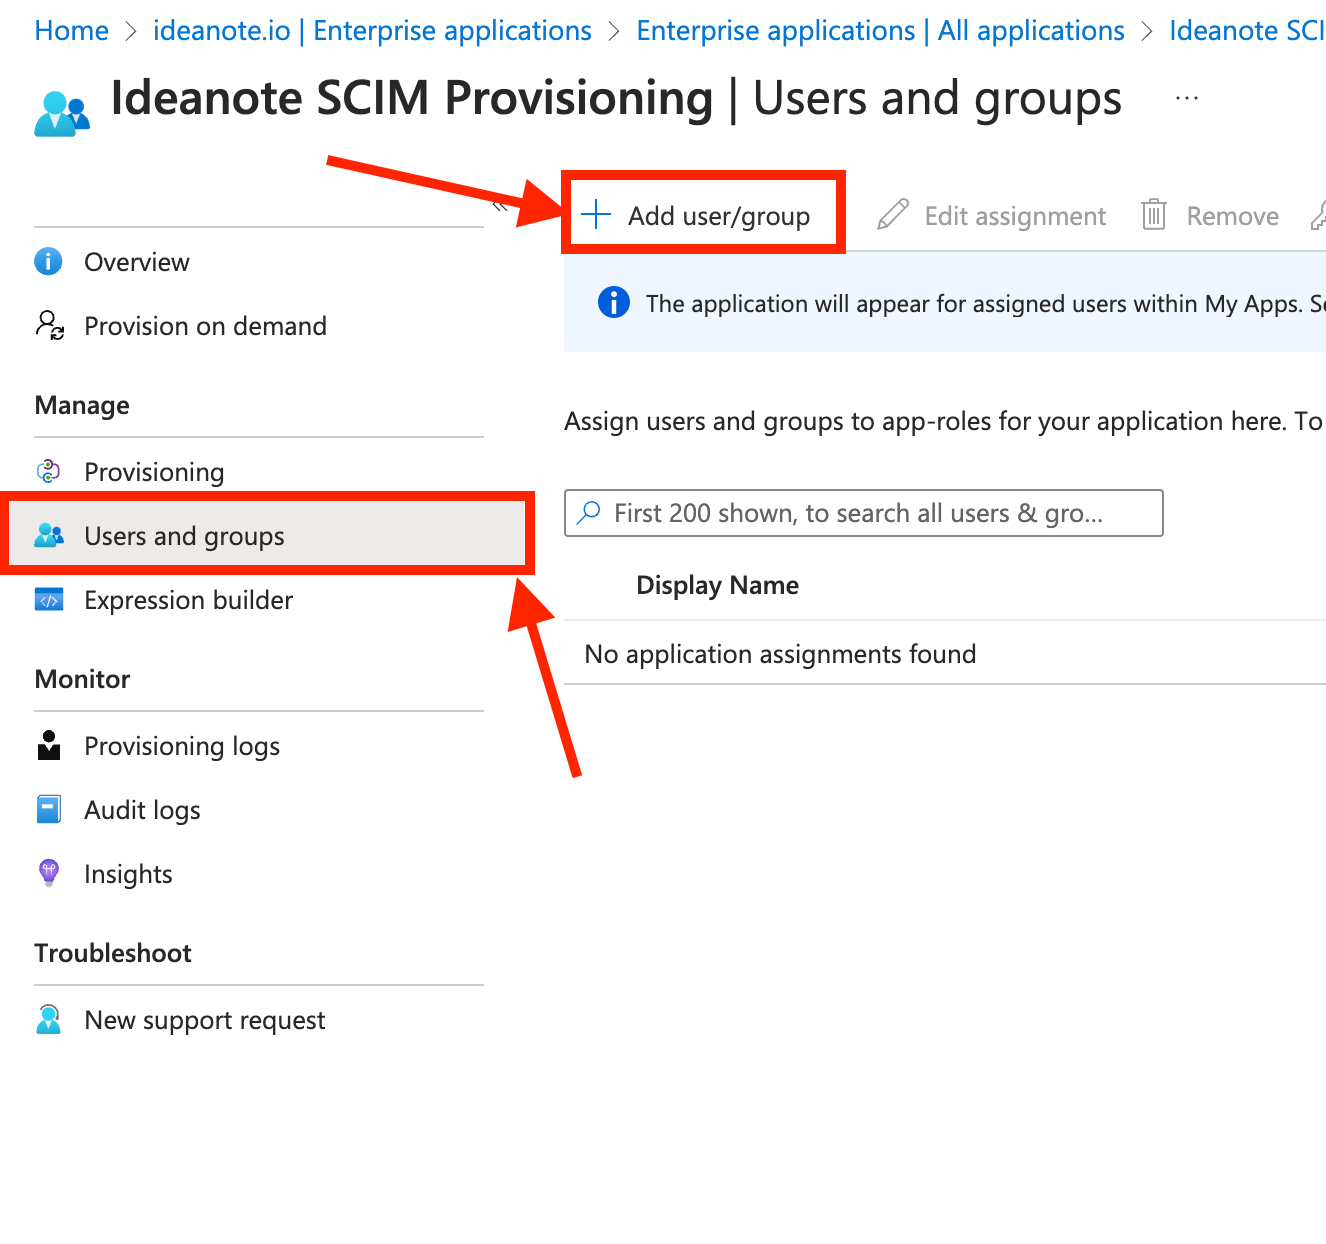
9.8.1. Click 'Users and groups'
9.8.2. Click 'Add user/group'

9.8.2.1. Under 'Users and groups', click 'None selected'
9.8.2.2. Search for the users and/or groups you want to add.
9.8.2.3. Click 'Select' to add the selected users to the application.
9.9. You've now successfully set up SCIM provisioning! Microsoft Entra ID will provision your users and groups automatically at fixed intervals. If you want to test that provisioning first, you can provision a user or a group on-demand:
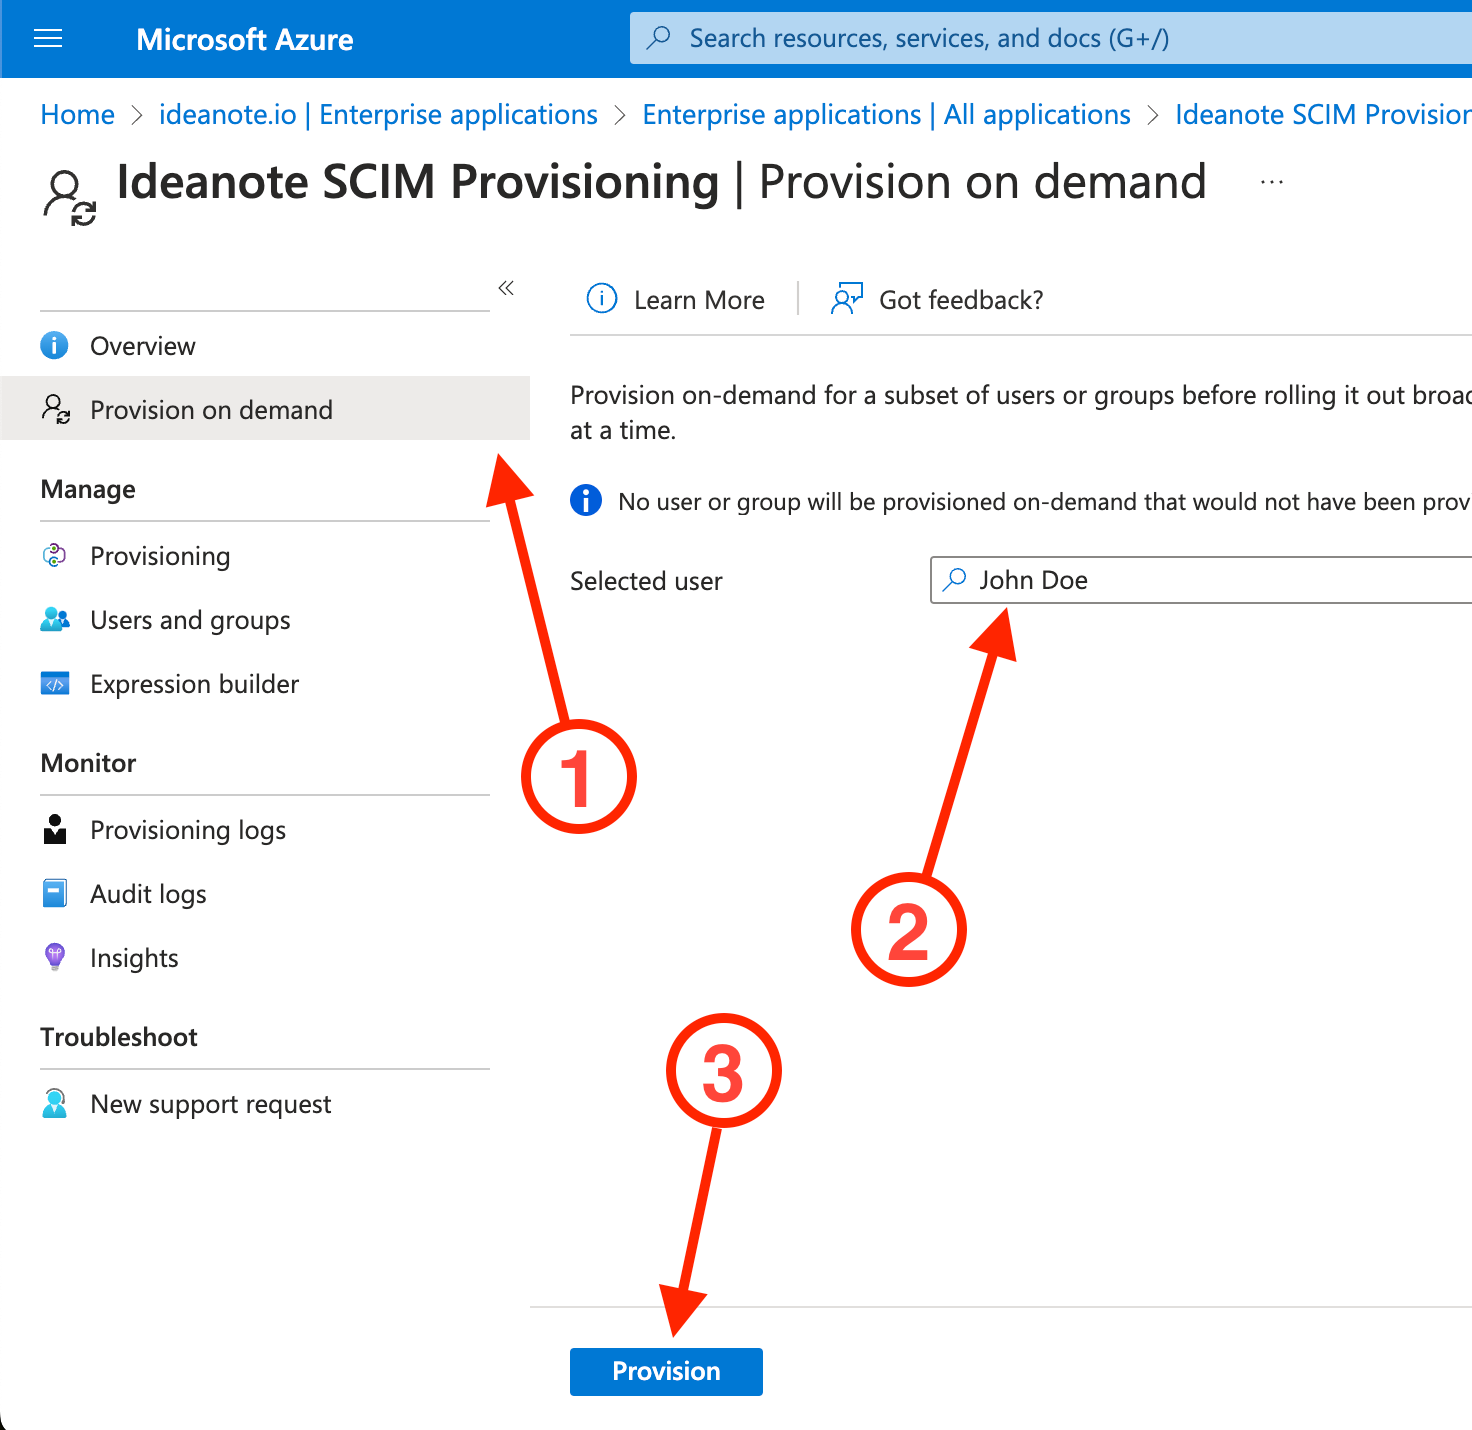
9.9.1. Click 'Provision on demand'
9.9.2. Under 'Selected user', search for the user or group you want to provision
9.9.3. Click 'Provision' to provision the user
9.9.4. If you selected a user, it should now appear inside the "People" settings page on your Ideanote workspace. If you selected a Group, it should now appear as a team inside the "Teams" tab.
9.10. You've now successfully set up SCIM and provisioned your first user!
9.11. You can see when a user was most recently synced with SCIM, as well as their External ID inside the "People" settings page on your Ideanote workspace:
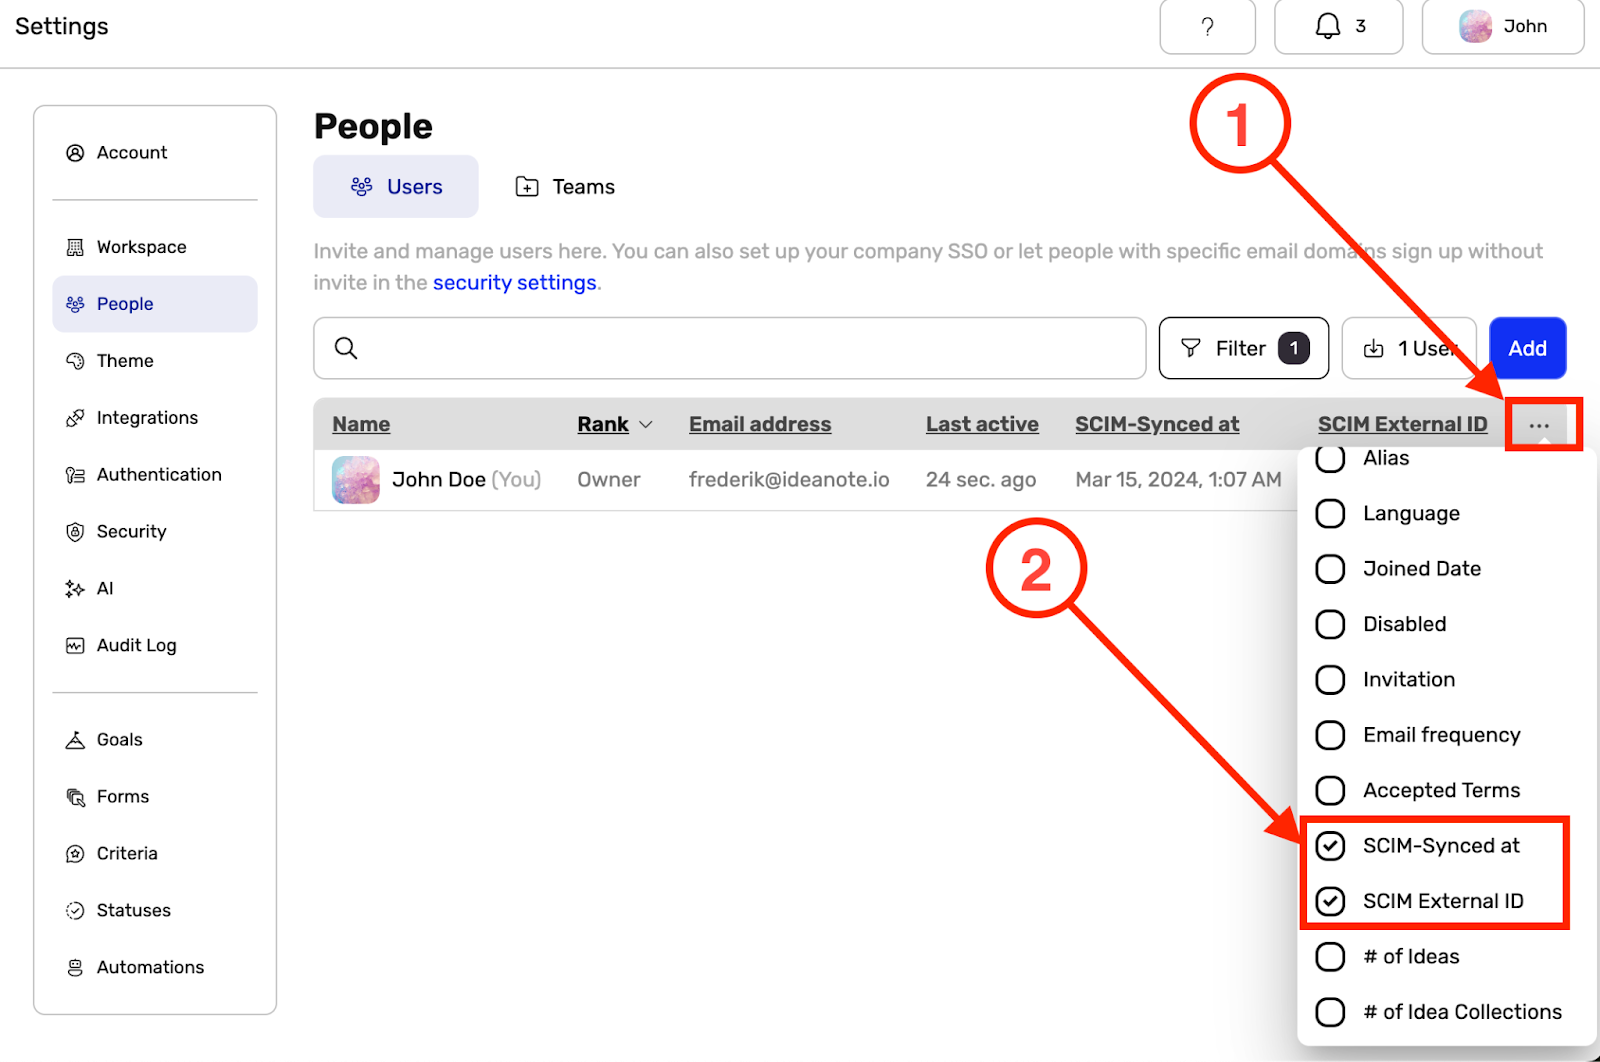
9.11.1. Scroll to the right-most visible column in the table and click the three horizontal dots (...)
9.11.2. Make sure 'SCIM-Synced at' and/or 'SCIM External ID' is checked for them to appear inside the table.
9.12. Microsoft Entra ID will take care of syncing changes to Ideanote over time at fixed intervals. When you delete a user from Entra ID, the user will also be deleted from your Ideanote workspace. When you unassign a user from the Enterprise application you created for SCIM provisioning, the user will instead be disabled in Ideanote. This is governed by rules described by Microsoft in this article under the section "Deprovisioning events".
Using SCIM With Ideanote and Okta
While the basic steps and principles in the base guide for setting up SCIM-provisioning on Ideanote using Microsoft Entra ID are very similar when using Okta, this addendum to the guide is specifically focused on achieving it with Okta. You can always refer to the official Okta documentation for setting up SCIM-provisioning for an app integration, which this guide is loosely based on.
1. First and foremost, setting up SCIM with Okta requires an existing SSO integration app within Okta that relies on either SAML 2.0 or SWA, and of these two, Ideanote supports SAML. Please note that you do not need to actually set up a SAML login solution on your Ideanote workspace for this to work. If you have already set up a SAML integration app for Ideanote in your Okta Admin Console, skip ahead to step 7. Otherwise, please proceed with the next step.
2. First, navigate to your Okta Admin console.
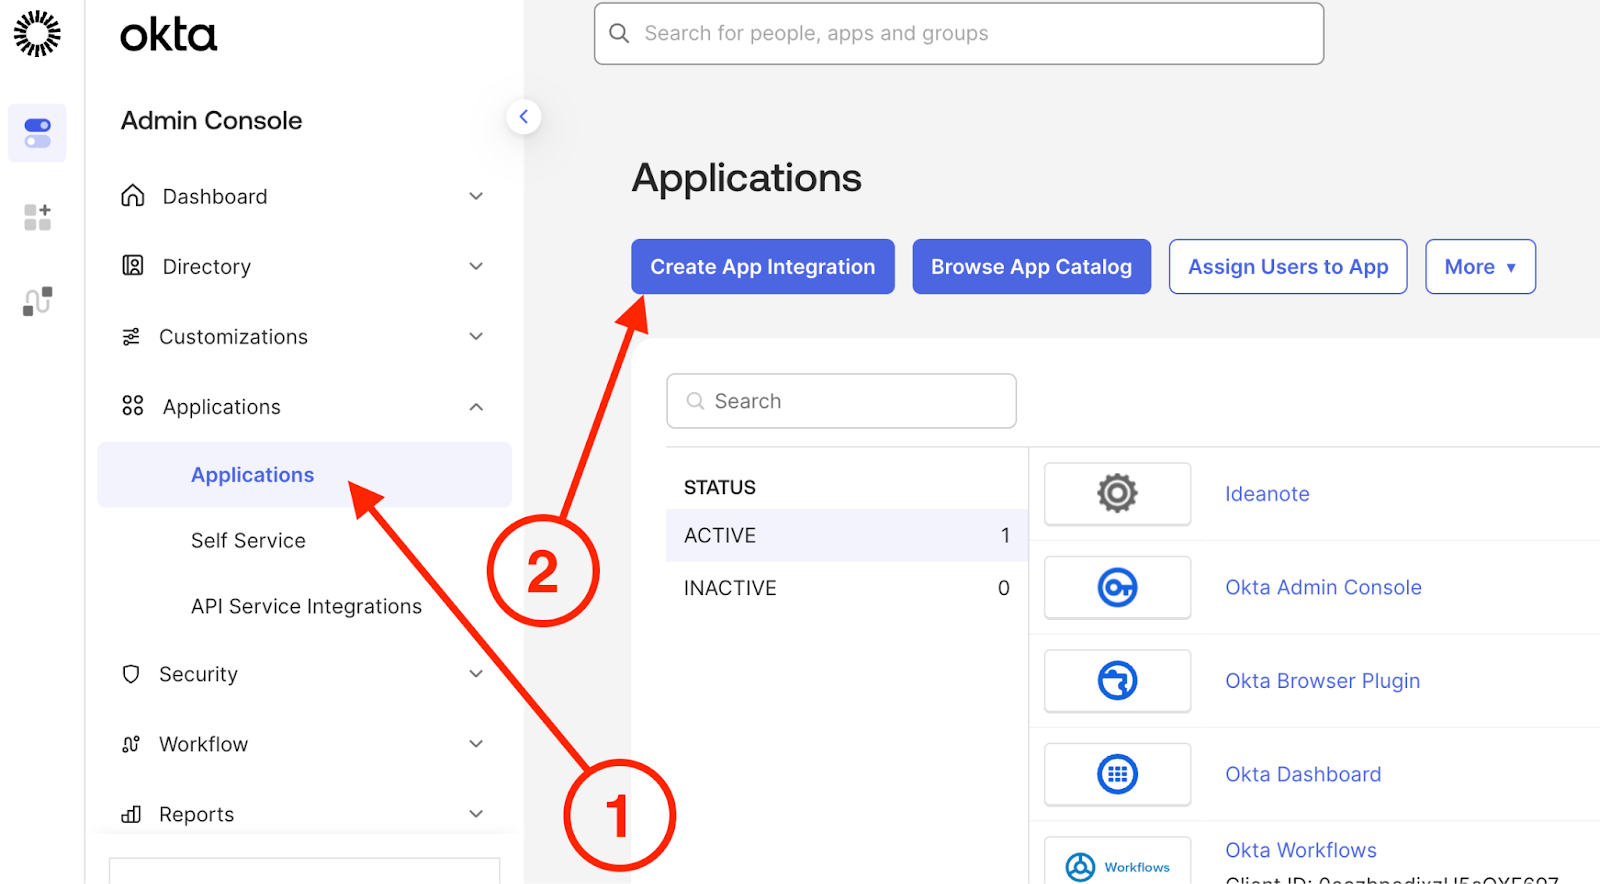
2.1. Go to the 'Applications' tab in the sidebar
2.2. Click 'Create App Integration'
3. A 'Create a new app integration' modal will appear.
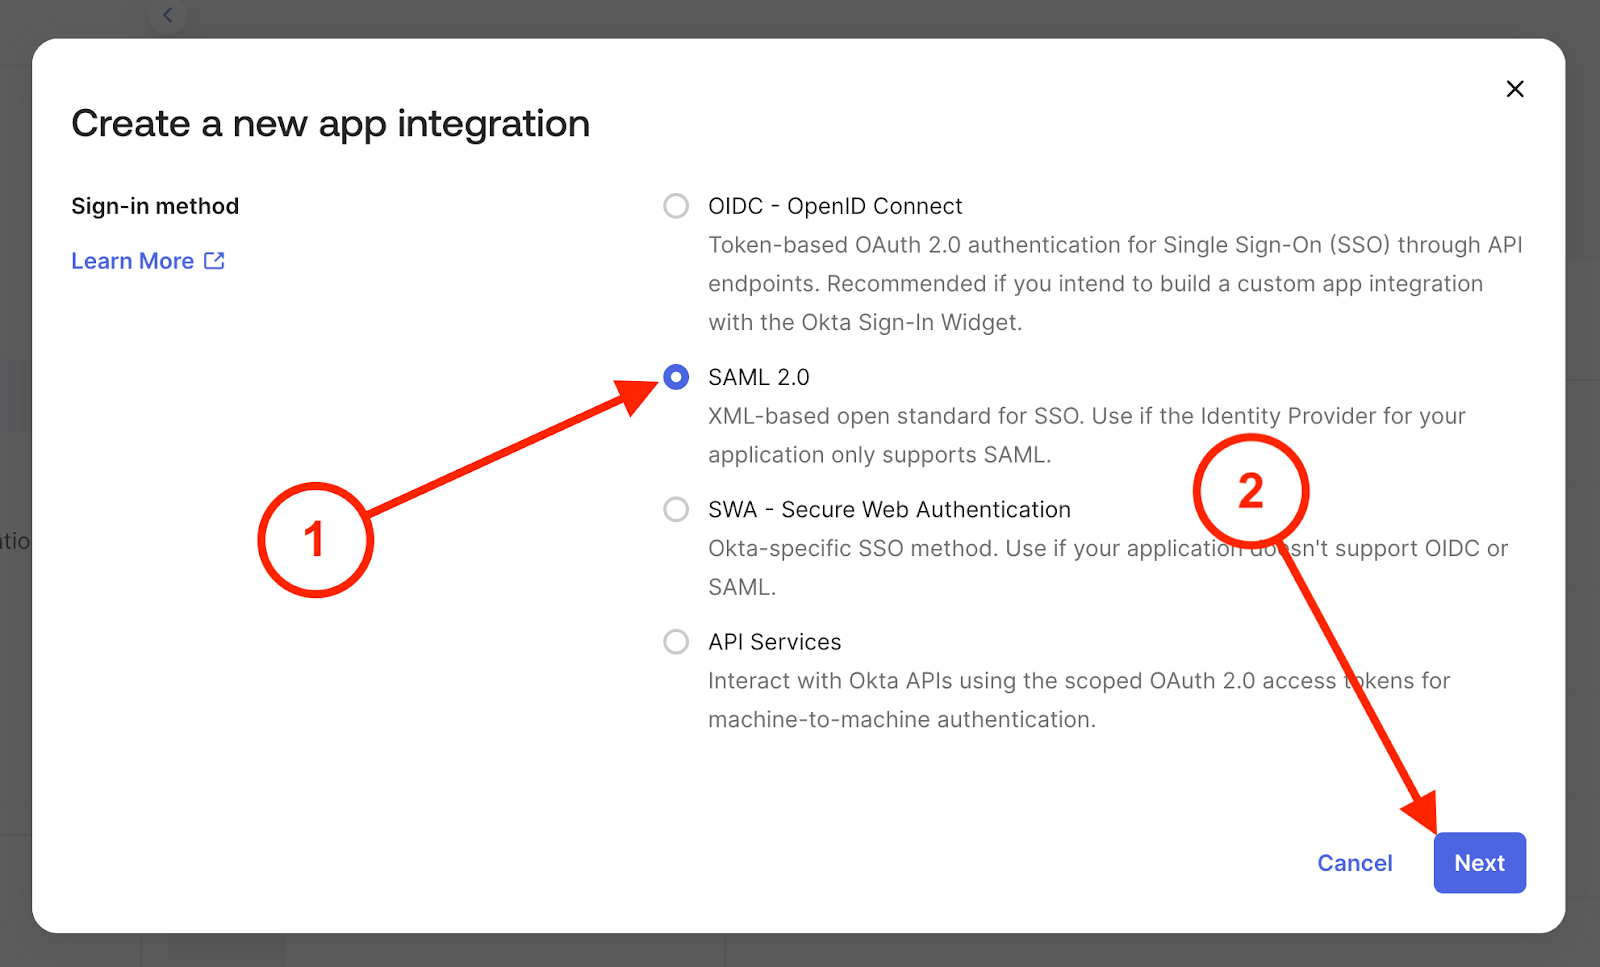
3.1. Select 'SAML 2.0' from the list
3.2. Click 'Next'
3.2.1. Note: If you have an existing Okta SSO app integration for Ideanote using OIDC (OpenID Connect), you will need to configure a new, separate one using SAML 2.0, as Okta doesn't support SCIM in combination with OIDC. You can set up an SSO integration app in Okta using SAML without exposing it as a login method on Ideanote.
4. You will be redirected to a wizard for setting up a new SAML integration.
{IMAGE: Screenshot of Okta "Create SAML Integration" wizard on step 1 "General Settings". A progress indicator shows steps: 1 General Settings (active), 2 Configure SAML. The form shows fields for "App name" (filled with "Ideanote"), "App logo (optional)" with a gear icon placeholder and upload/delete buttons, and "App visibility" with an unchecked checkbox "Do not display application icon to users". Cancel and Next buttons appear at bottom. Numbered indicators (1, 2) point to the App name field and Next button.}
4.1. Under 'App name', give it a fitting name, such as 'Ideanote'
4.2. Click 'Next'
5. You will now be presented with the 'Configure SAML' page. At this point, you should decide on whether or not you want to simultaneously set up SAML as a login method on your Ideanote workspace. You can just fill out the fields here, in case you only want to set up SCIM and continue to use your existing login method(s) on your Ideanote workspace, but in case you want to use SAML for authentication alongside SCIM-provisioning, please now go to your Ideanote workspace, and follow our SAML SSO guide for setting up a SAML login provider on your workspace.
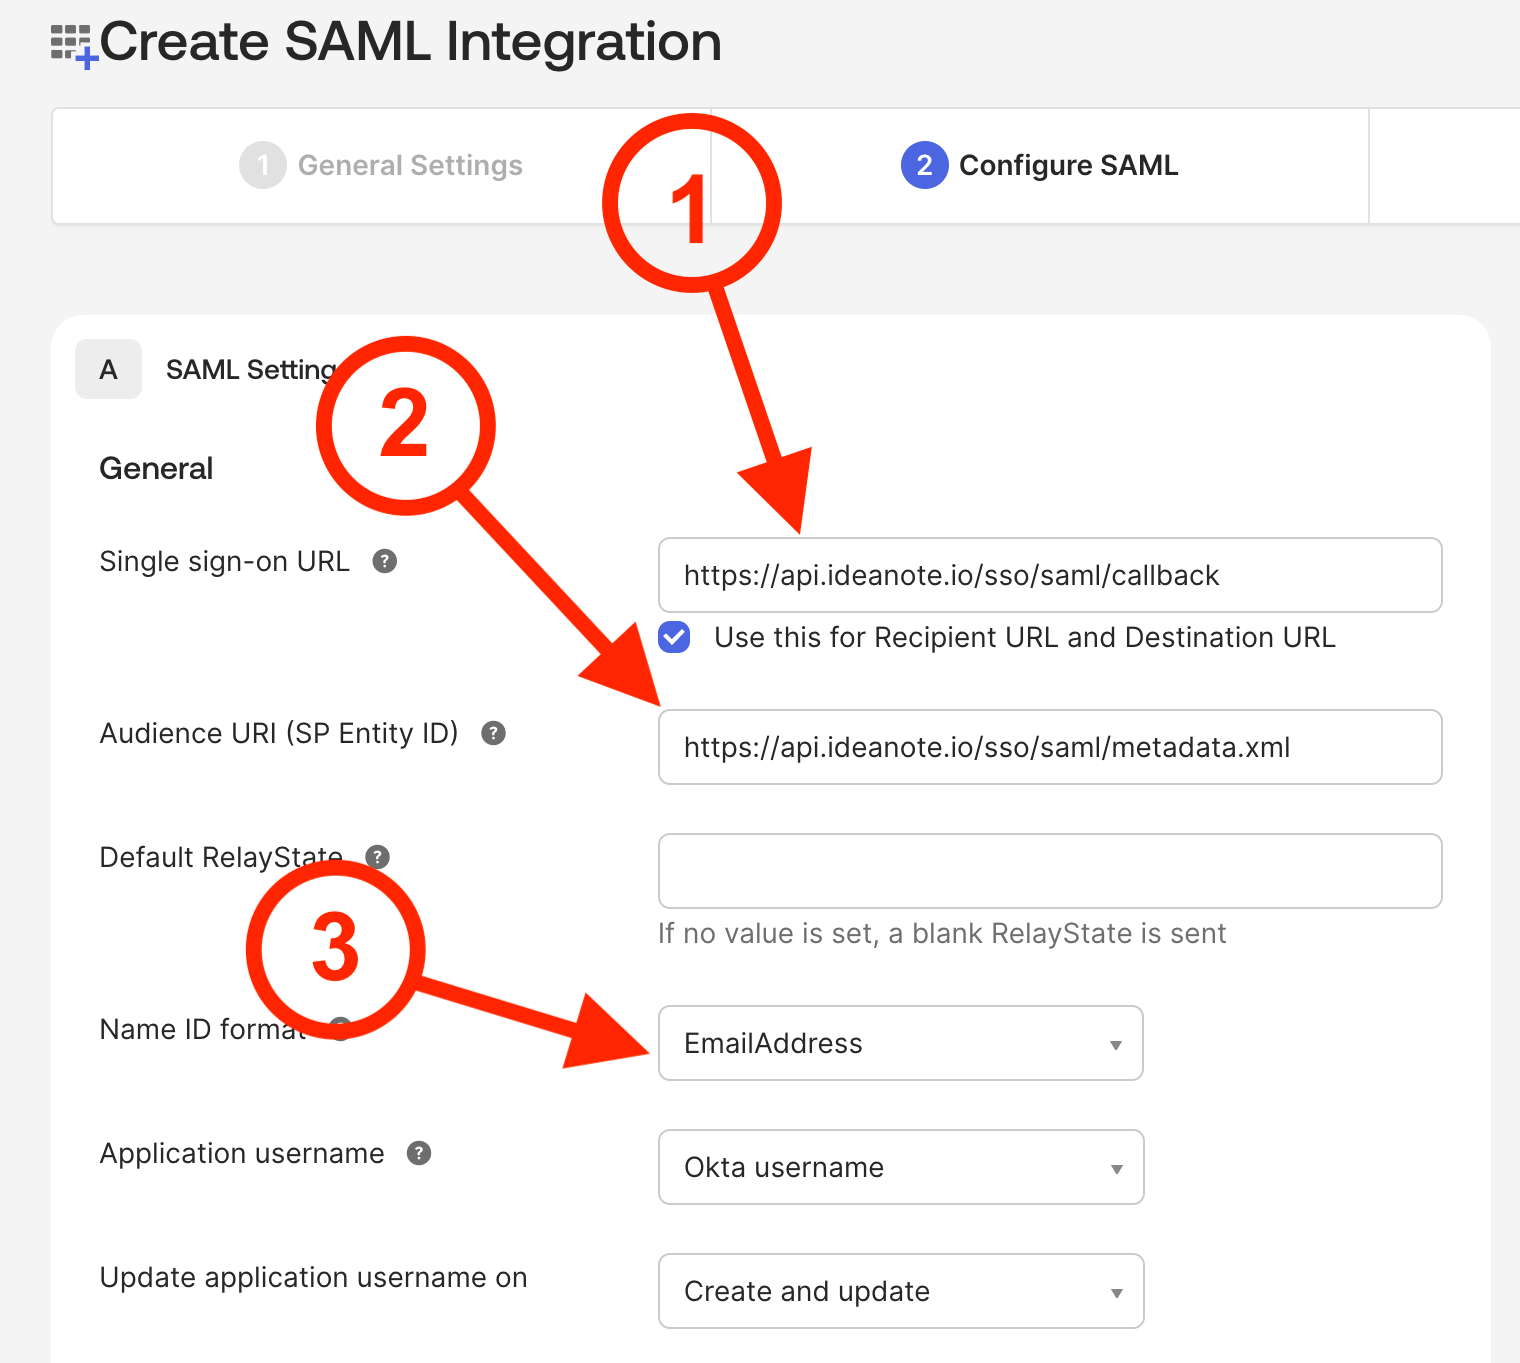
5.1. Under 'Single sign-on URL', fill in https://api.ideanote.io/sso/saml/callback
5.2. Under 'Audience URI (SP Entity ID)', fill in https://api.ideanote.io/sso/saml/metadata.xml
5.3. Under 'Name ID format', select 'EmailAddress'
5.4. Click 'Next' to continue
6. On the final page of the wizard, you'll need to mark the application as internal

6.1. Toggle 'This is an internal app that we have created' on, and press 'Finish'. You will now be redirected to your new application.
7. From your Okta SSO integration app, click 'Edit'
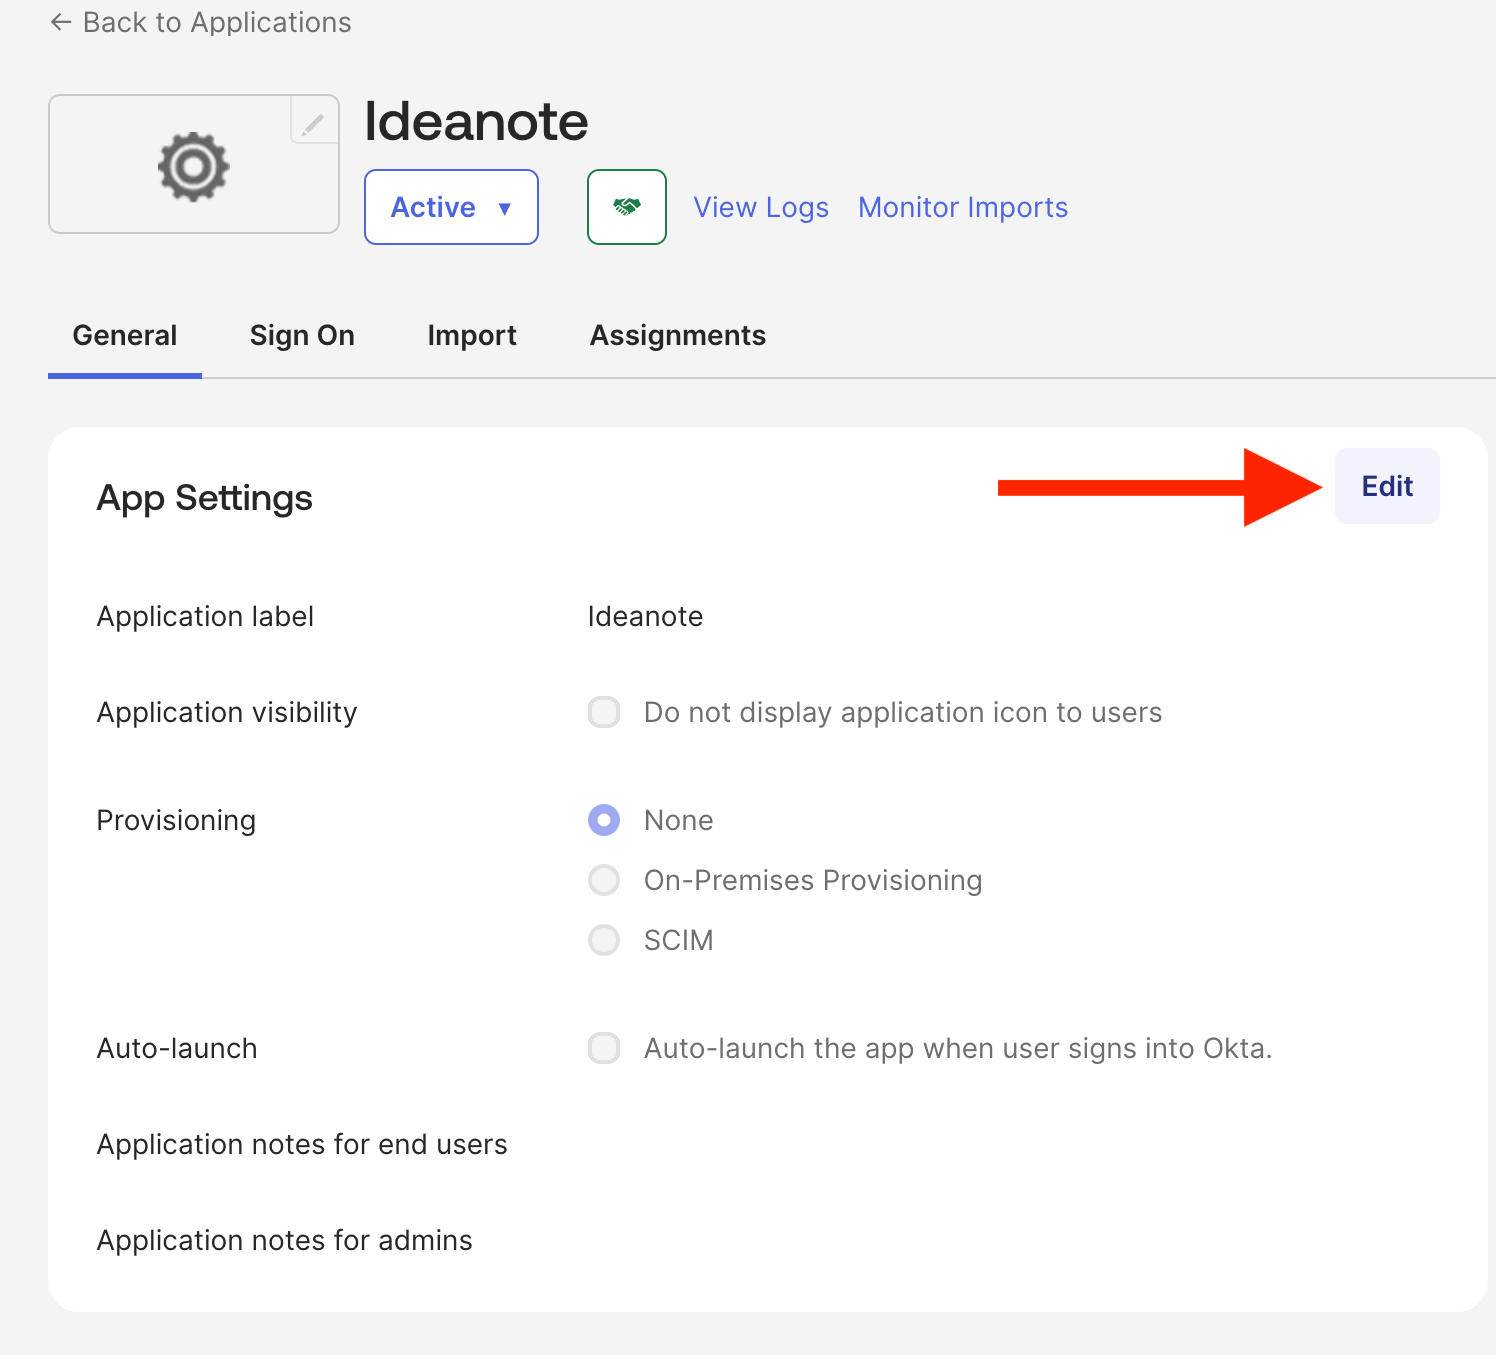
8. From the modal that appears, a 'Provisioning' section will be visible.

8.1. Under 'Provisioning', select 'SCIM'
8.2. Click 'Save'
9. After saving, you will be taken back to your SSO integration app.

9.1. Make sure you're on the 'Provisioning' tab.
9.2. Click 'Edit'
10. You're now ready to fill in the SCIM Connection details. But first, you must make sure that you have set up a SCIM integration on your Ideanote workspace. To do so, please follow the base 'Using SCIM with Ideanote' guide from step 1 to step 3 to set up a SCIM integration on your Ideanote workspace. Once that is done, you can return to Okta to fill in the SCIM Connection details.

10.1. Under 'SCIM connector base URL', fill in https://api.ideanote.io/scim/v2
10.2. Under 'Unique identifier field for users', fill in 'userName'
10.3. Under 'Supported provisioning actions', select what types of actions you want Okta to synchronize via SCIM. If you want to make sure users and groups/teams are always up-to-date within your Ideanote workspace, make sure to toggle on all of the options starting with the word 'Push'
10.3.1. Note: Okta also supports importing data from your Ideanote workspace into Okta. However, we generally recommend a push-only approach, such that your User/Group Directory within Okta is the single source of truth
10.4. Under the 'Authentication Mode' dropdown, select 'HTTP Header'
10.5. Head back into your Ideanote workspace, under your SCIM integration settings, and copy your 'Secret token' to your clipboard.
10.6. Now, back in Okta, insert it in the 'Authorization' header text field, right next to where the interface says 'Bearer'.
10.7. Click 'Test Connector Configuration' to verify that Okta can communicate with your workspace correctly.
10.8. If all went well, click 'Save' to proceed. If it didn't, please double-check all of your entries and go through the steps in this guide again.
11. You will be taken back to the 'Provisioning' tab of your SSO integration app, but this time you can see and customize a lot more.

11.1. Click 'Edit' to un-disable the toggles.
11.2. Enable 'Create Users' if you want users from your Okta Directory to be created in (or synced to) your Ideanote workspace when they're assigned to your Okta SSO integration app
11.3. Enable 'Update User Attributes' if you want to continuously synchronize the attributes of assigned users within your Ideanote workspace based on the state in your Okta directory as they change over time
11.4. Enable 'Deactivate Users' if you want to disable a user within your Ideanote workspace if and when they're unassigned from your Okta SSO integration app
11.5. The 'Sync Password' option is not supported.
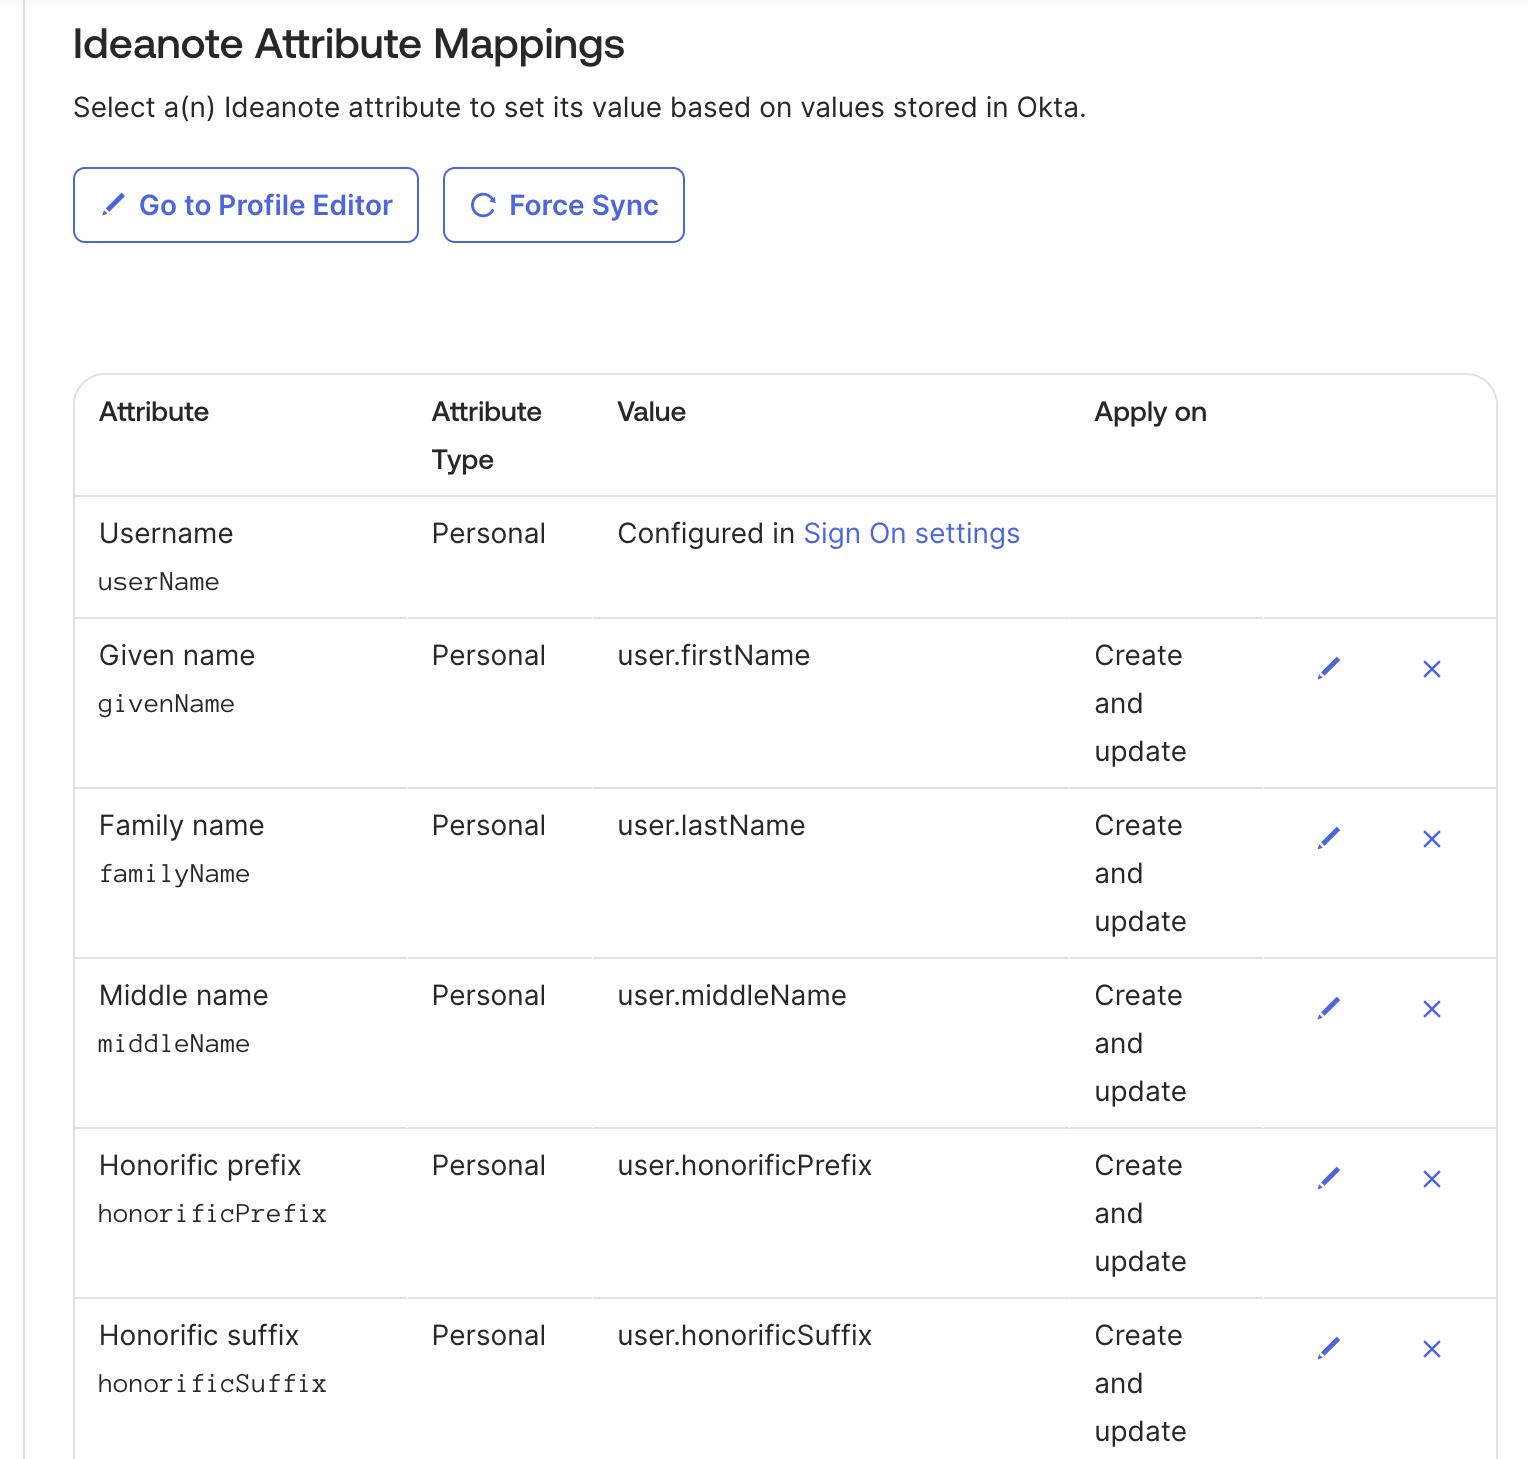
12. Under 'Attribute Mappings', you will be able to see and customize how user attributes defined inside your Okta directory will be mapped over to users within your Ideanote workspace. You can use the 'Force Sync' button to force a synchronization of all users and user attribute values from your Okta directory into Ideanote, for all users currently assigned to the SSO integration app you've set up.
13. To test and verify provisioning, make sure to 'Assign' the users and groups you want to the SSO integration app you've set up for Ideanote. You can do so by:

13.1. Navigating to the 'People' (or 'Groups') page of your Okta directory
13.2. Click a user (or group) in the list
13.3. Click 'Assign Applications' to associate the user/group with an application. There, you should select the SSO integration app you have set up for Ideanote.
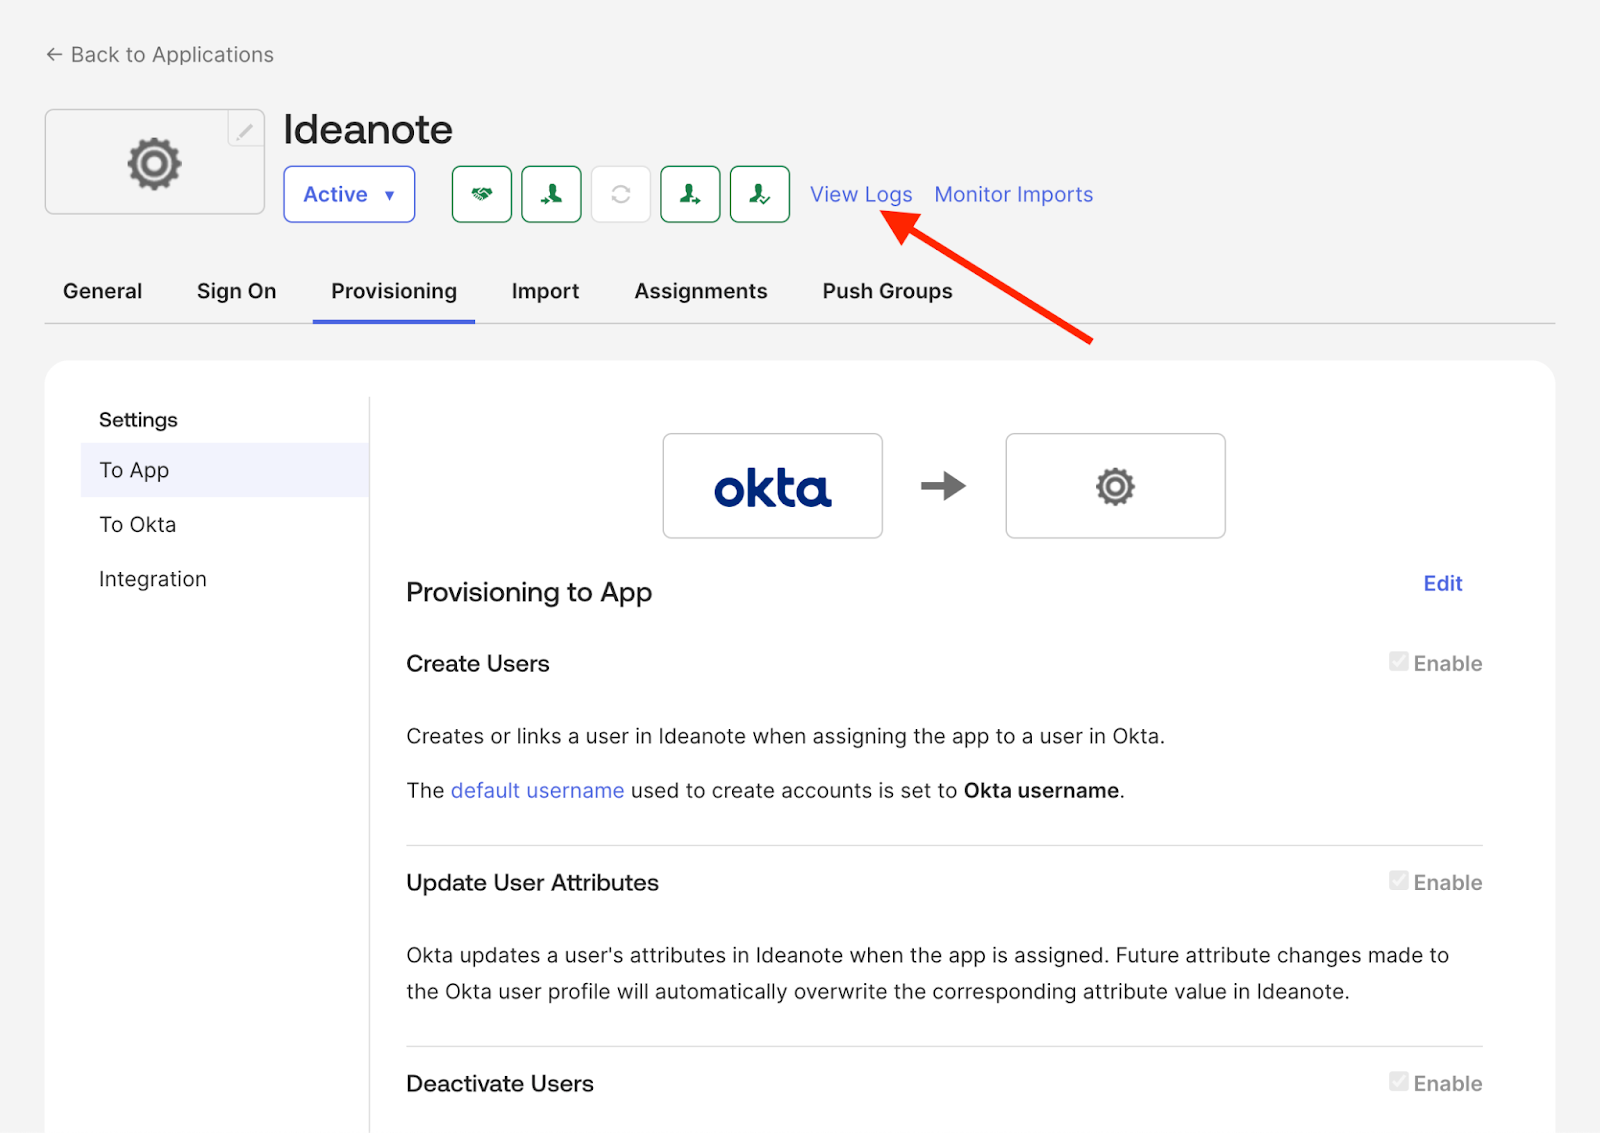
14. Okta SCIM provisioning is quite fast, and tends to run shortly after performing a change inside your Okta directory. If you want to see the provisioning logs, you can do so directly from the SSO integration app you've set up in Okta for SCIM, by clicking 'View Logs'
15. You've now successfully set up SCIM!
16. You can see when a user was most recently synced with SCIM, as well as their External ID inside the "People" settings page on your Ideanote workspace:
16.1. Scroll to the right-most visible column in the table and click the three horizontal dots (...)
16.2. Make sure 'SCIM-Synced at' and/or 'SCIM External ID' is checked for them to appear inside the table.
17. Okta will take care of syncing changes to Ideanote over time at fixed intervals. Depending on what toggles you enabled under step 10.3, users will also be disabled from your Ideanote workspace when they're unassigned from your Okta SSO integration app.