


Utiliser SCIM avec Ideanote
Remarque : Ce guide est destiné aux propriétaires d'espaces de travail
Le SCIM (System for Cross-Domain Identity Management) est une norme ouverte qui permet d'automatiser le provisionnement des utilisateurs entre les systèmes logiciels, par exemple entre votre infrastructure informatique et la plateforme Ideanote. Il vous permet de créer, de mettre à jour, de désactiver et de supprimer des utilisateurs et des équipes depuis votre propre système, par exemple à partir d'une application Microsoft Entra ID/Azure AD que vous avez configurée en interne pour une utilisation avec Ideanote.
Avec SCIM, vous pouvez préparer tous vos utilisateurs, équipes et leurs adhésions au sein de ces équipes, depuis votre propre système, de manière à ce que tout soit synchronisé avec Ideanote et prêt pour le lancement d'une campagne, sans avoir à demander à vos utilisateurs de rejoindre la plateforme à l'avance.
Si vous combinez SCIM avec une authentification basée sur SAML ou OIDC, le provisionnement et l'authentification des utilisateurs sont entièrement gérés par votre propre infrastructure informatique.
Ideanote est entièrement conforme à la norme SCIM et prend en charge tous les attributs SCIM requis ainsi que de nombreux attributs facultatifs pour les utilisateurs et les groupes. Tous ces éléments sont détectables via notre API publique via des points de terminaison standardisés, ainsi que directement depuis la plateforme Ideanote.
Ce guide vous aidera à démarrer le plus facilement possible avec SCIM sur Ideanote.
Nous utiliserons Microsoft Entra ID (anciennement Azure Active Directory) pour les exemples de ce guide, mais les principes devraient s'appliquer à tout fournisseur d'identité conforme à la norme SCIM.
1) Accédez d'abord à votre espace de travail Ideanote.
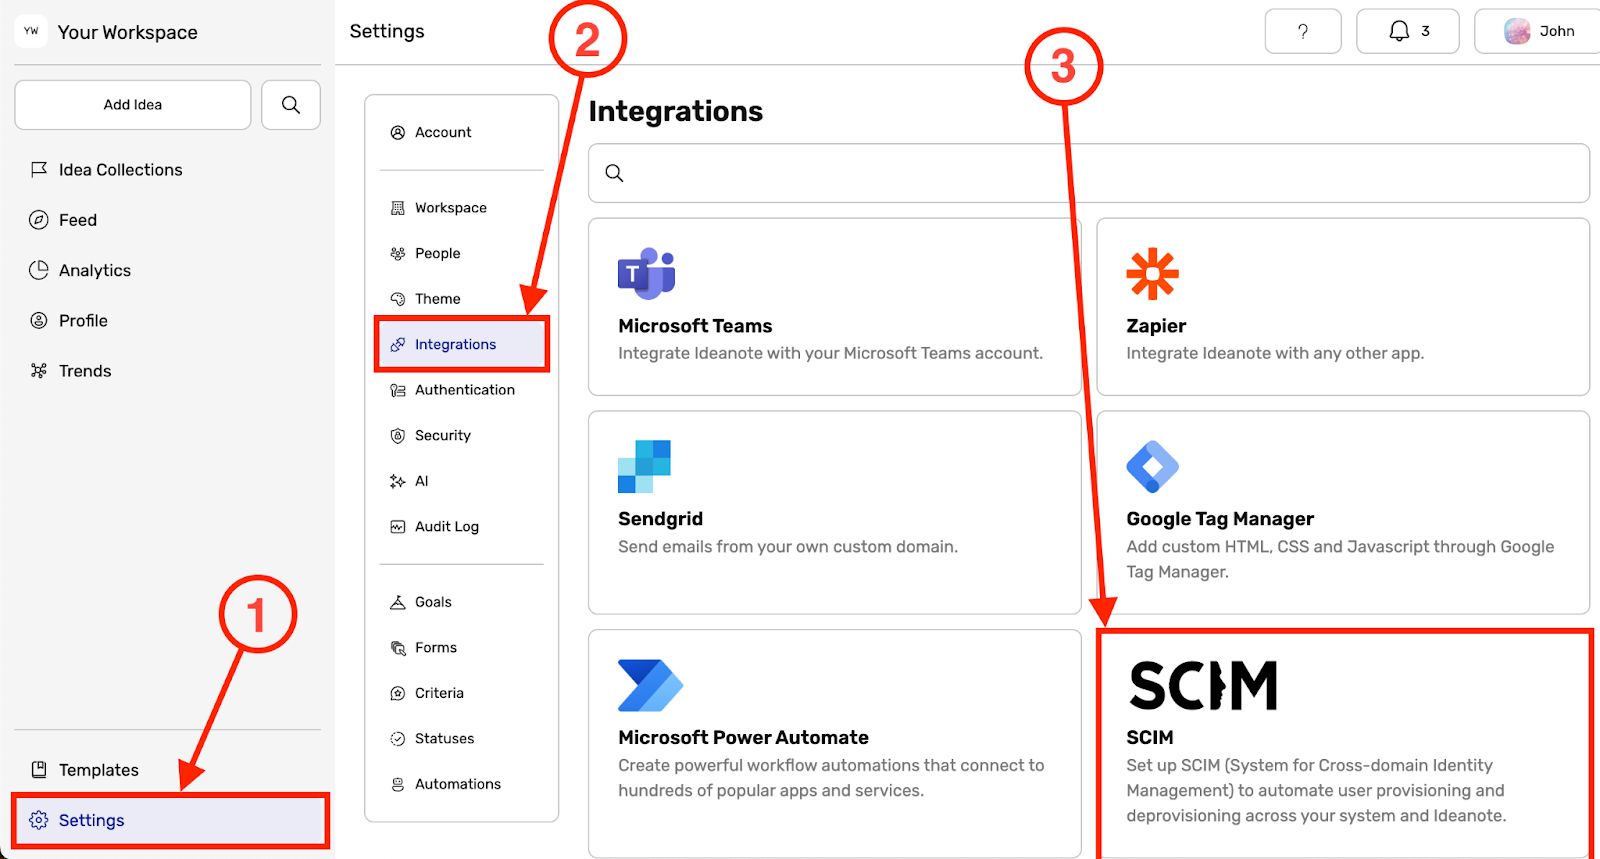
1.1) Cliquez « Réglages » dans la barre latérale principale
1.2) Cliquez « Intégrations »
1.3) Cliquez « SCIME »
2) Une fenêtre de dialogue apparaît maintenant sur votre écran avec des informations relatives à votre configuration SCIM. Il est immédiatement prêt à être utilisé.
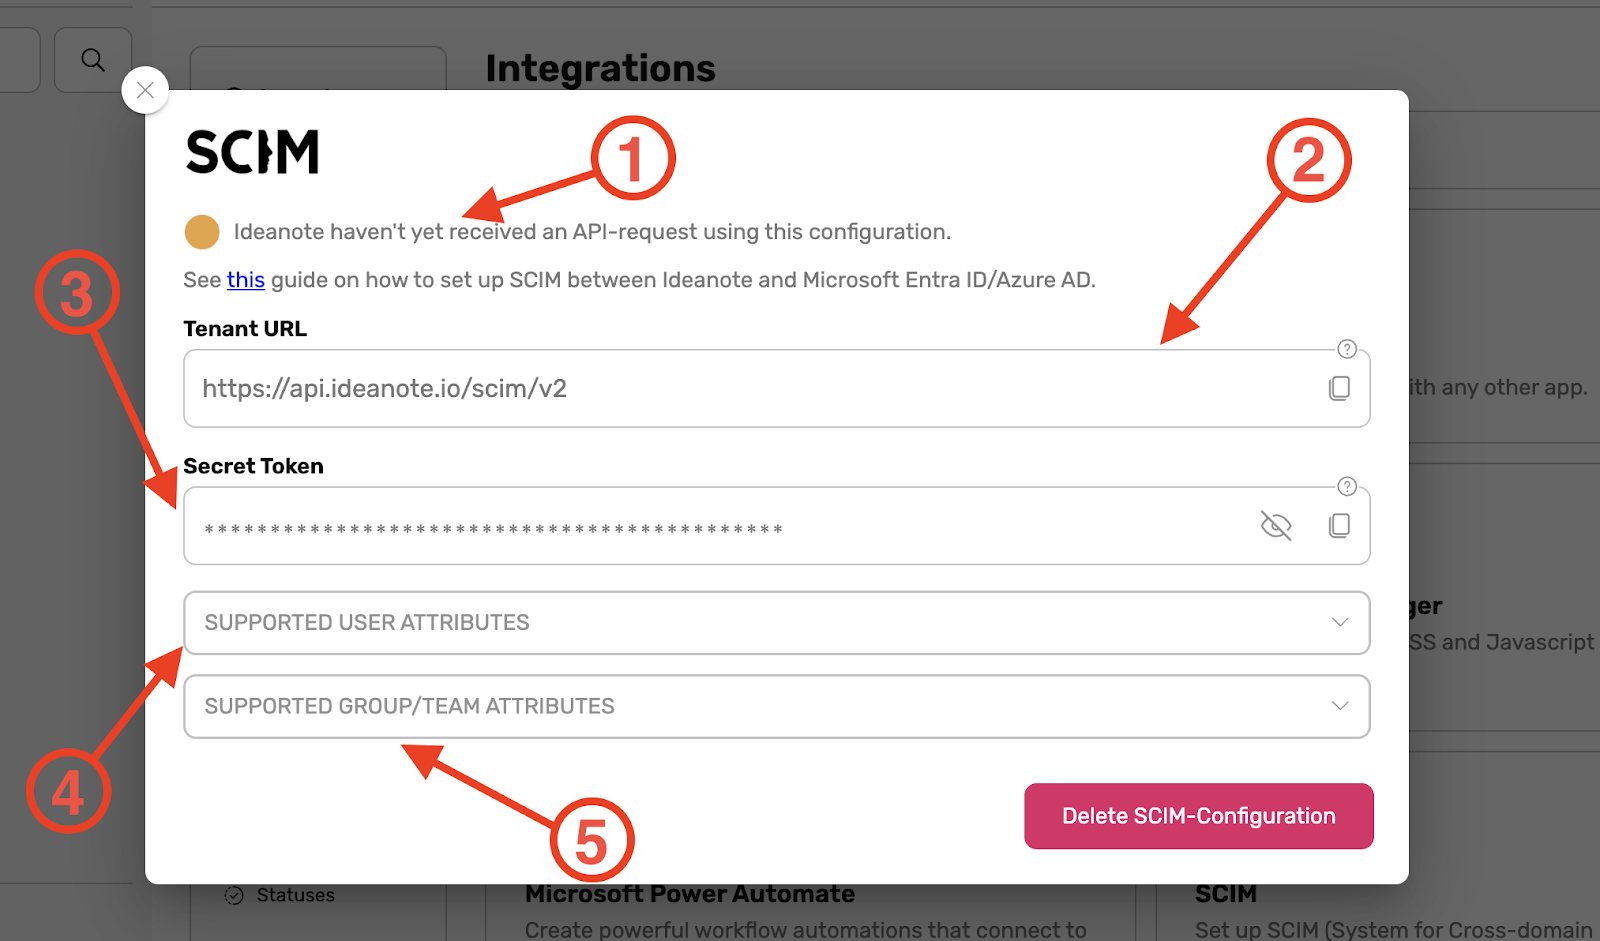
2.1) En haut de la boîte de dialogue, vous pourrez voir si Ideanote a déjà reçu une demande d'API utilisant cette configuration (voir 1 dans l'image ci-dessus).
2.1.1) Lorsque tout est configuré correctement et qu'une demande d'API a été reçue, le texte et la couleur de l'indicateur seront différents, comme le montre l'image ci-dessous :

2.2) Les « URL du locataire » est la racine des points de terminaison SCIM d'Ideanote. Vous devrez l'ajouter ultérieurement à l'application que vous configurerez pour Ideanote auprès de votre fournisseur d'identité.
2.3) Les « Jeton secret » est le jeton nécessaire pour authentifier les appels vers les terminaux SCIM d'Ideanote. Vous devrez l'ajouter ultérieurement à l'application qui sera configurée pour Ideanote dans votre fournisseur d'identité.
2.4) Les « Attributs utilisateur pris en charge » Le menu accordéon se développe en un tableau de tous les attributs SCIM pris en charge par Ideanote pour les utilisateurs SCIM, y compris nos propres extensions de schéma. Ces données proviennent directement de notre API lors de l'exécution et sont donc toujours à jour à 100 %.
2.5) Le menu accordéon « Attributs de groupe pris en charge » se développe en un tableau de tous les attributs SCIM pris en charge par Ideanote pour les groupes SCIM. Comme décrit à l'étape 2.4, ces données sont toujours à jour à 100 %.
2.6) Remarque : Si vous souhaitez supprimer une configuration SCIM, cliquez sur « Supprimer la configuration SCIM ».
3) Vous avez maintenant configuré votre espace de travail pour SCIM. Accédez ensuite à l'endroit à partir duquel vous gérez les utilisateurs et/ou l'infrastructure informatique de votre organisation, tel que Microsoft Entra ID.
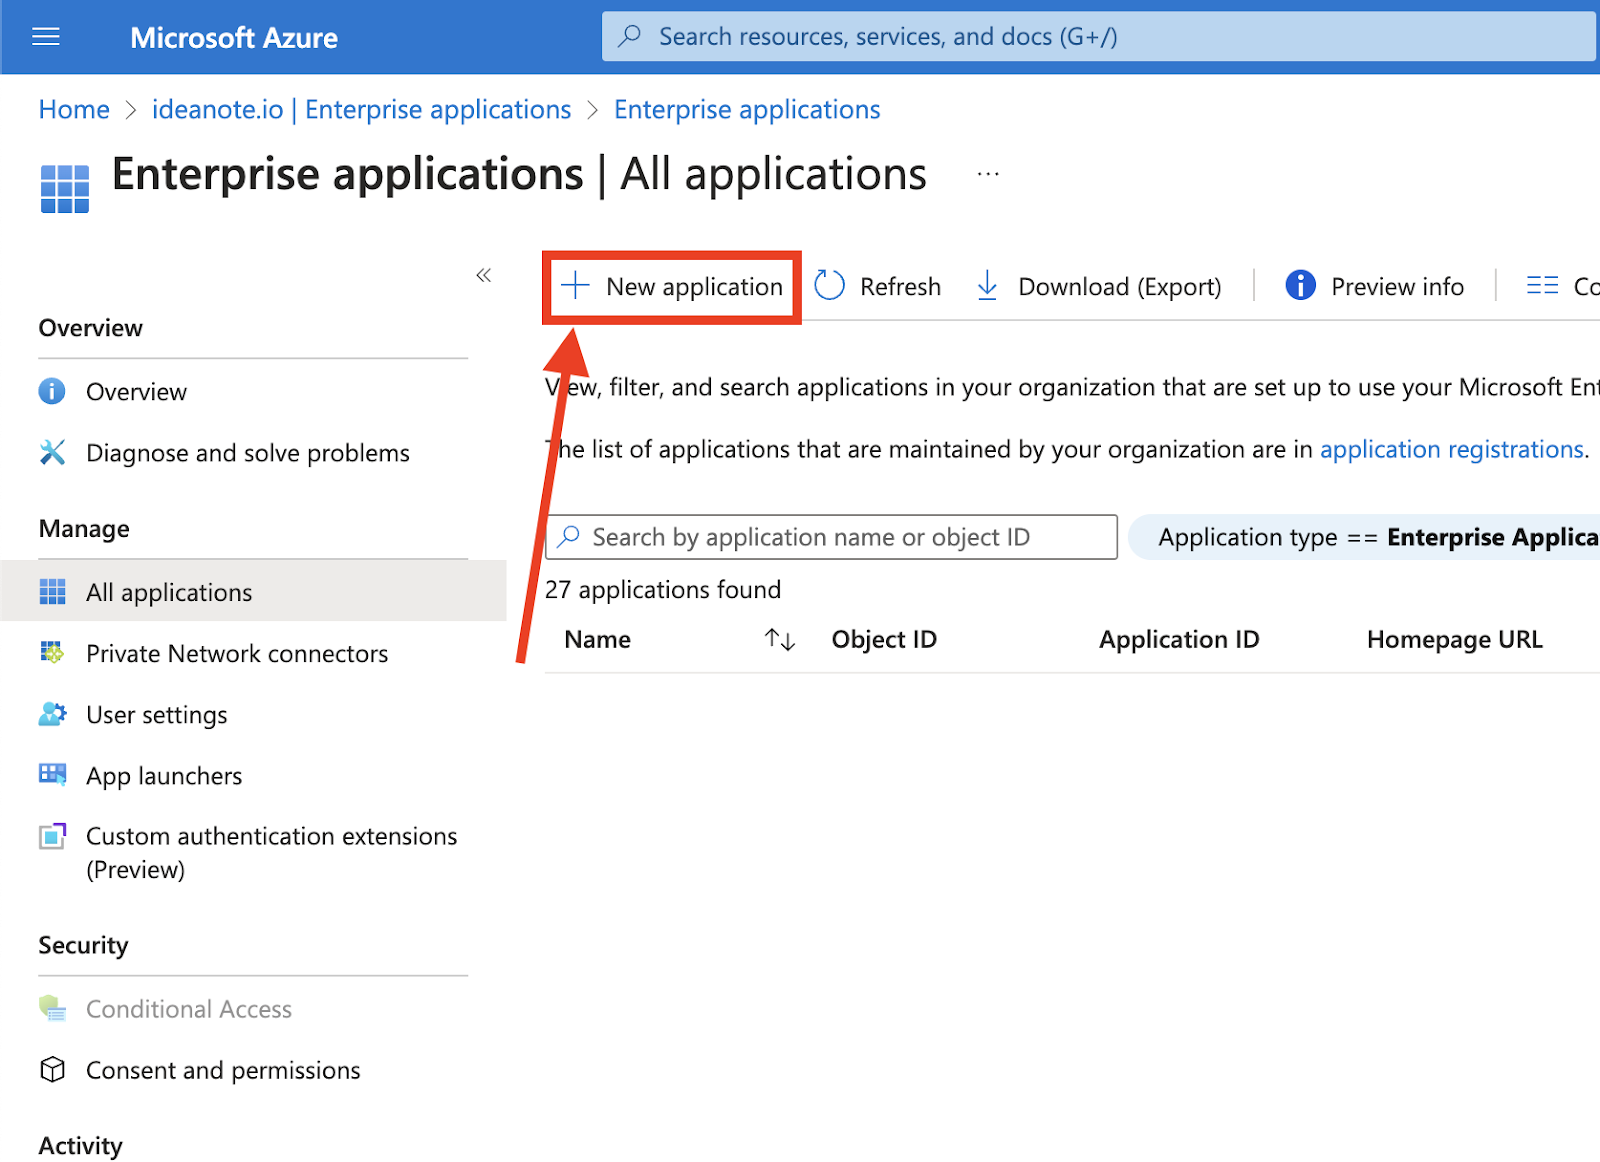
4) Depuis Microsoft Entra ID ou depuis le portail Azure, cliquez sur « Applications d'entreprise ».

5) Si vous avez déjà créé une application d'entreprise pour Ideanote par le passé, par exemple pour l'authentification basée sur SAML-/OIDC, recherchez-la dans la liste, cliquez dessus et passez directement à l'étape 7. Sinon, cliquez sur « Nouvelle demande ».
6) Vous allez maintenant accéder à une galerie d'applications existantes, mais vous allez en créer une nouvelle :
.
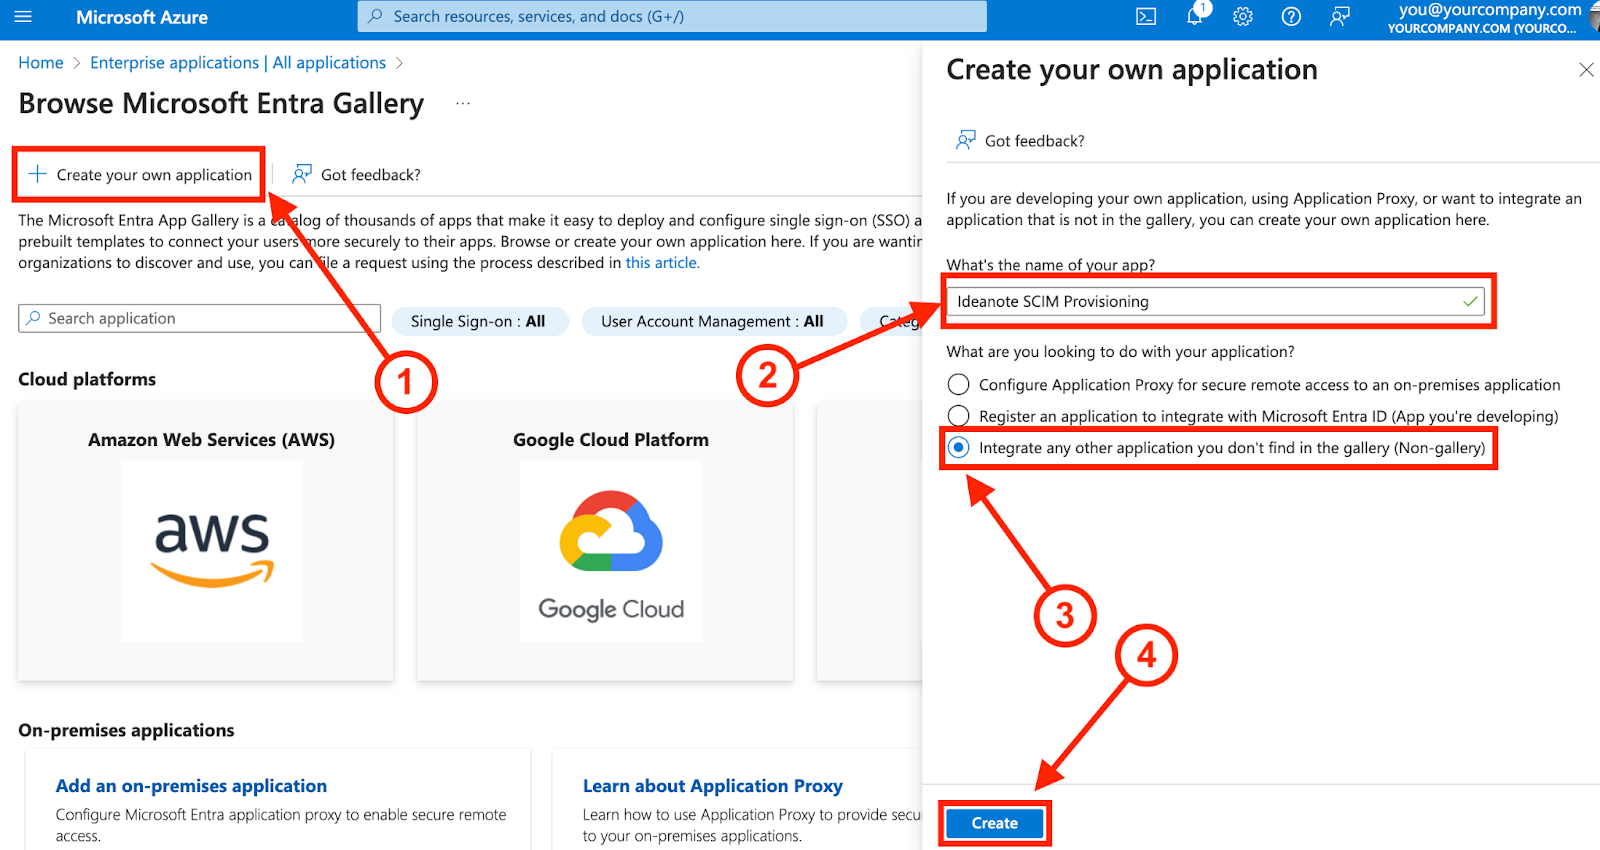
6.1) Cliquez « Créez votre propre application »
6.2) Moins « Quel est le nom de votre application ? », donnez-lui un nom approprié, tel que « Approvisionnement SCIM d'Ideanote ».
6.3) Moins « Que souhaitez-vous faire avec votre candidature ? », sélectionnez « Intégrez toute autre application que vous ne trouvez pas dans la galerie (hors galerie) ».
6.4) Cliquez sur « Créer » pour continuer. Vous allez maintenant être redirigé vers votre nouvelle application Enterprise.
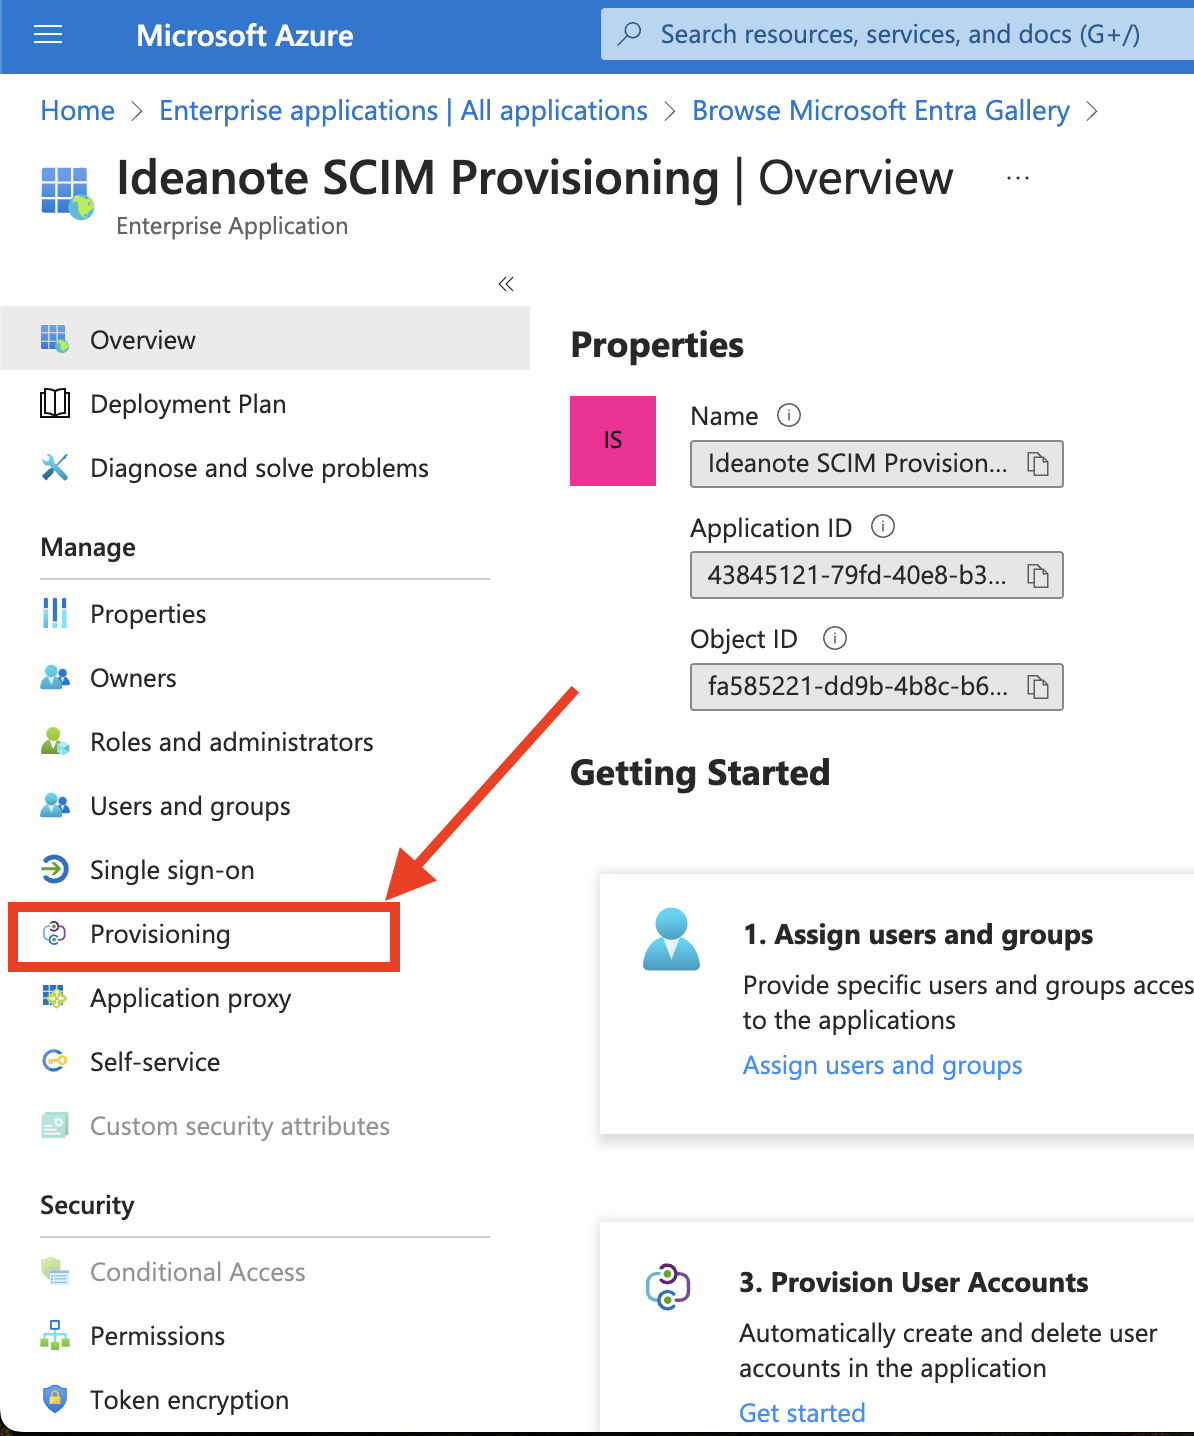
7) Depuis votre application, cliquez sur « Approvisionnement » dans la barre latérale sous « Gérer »
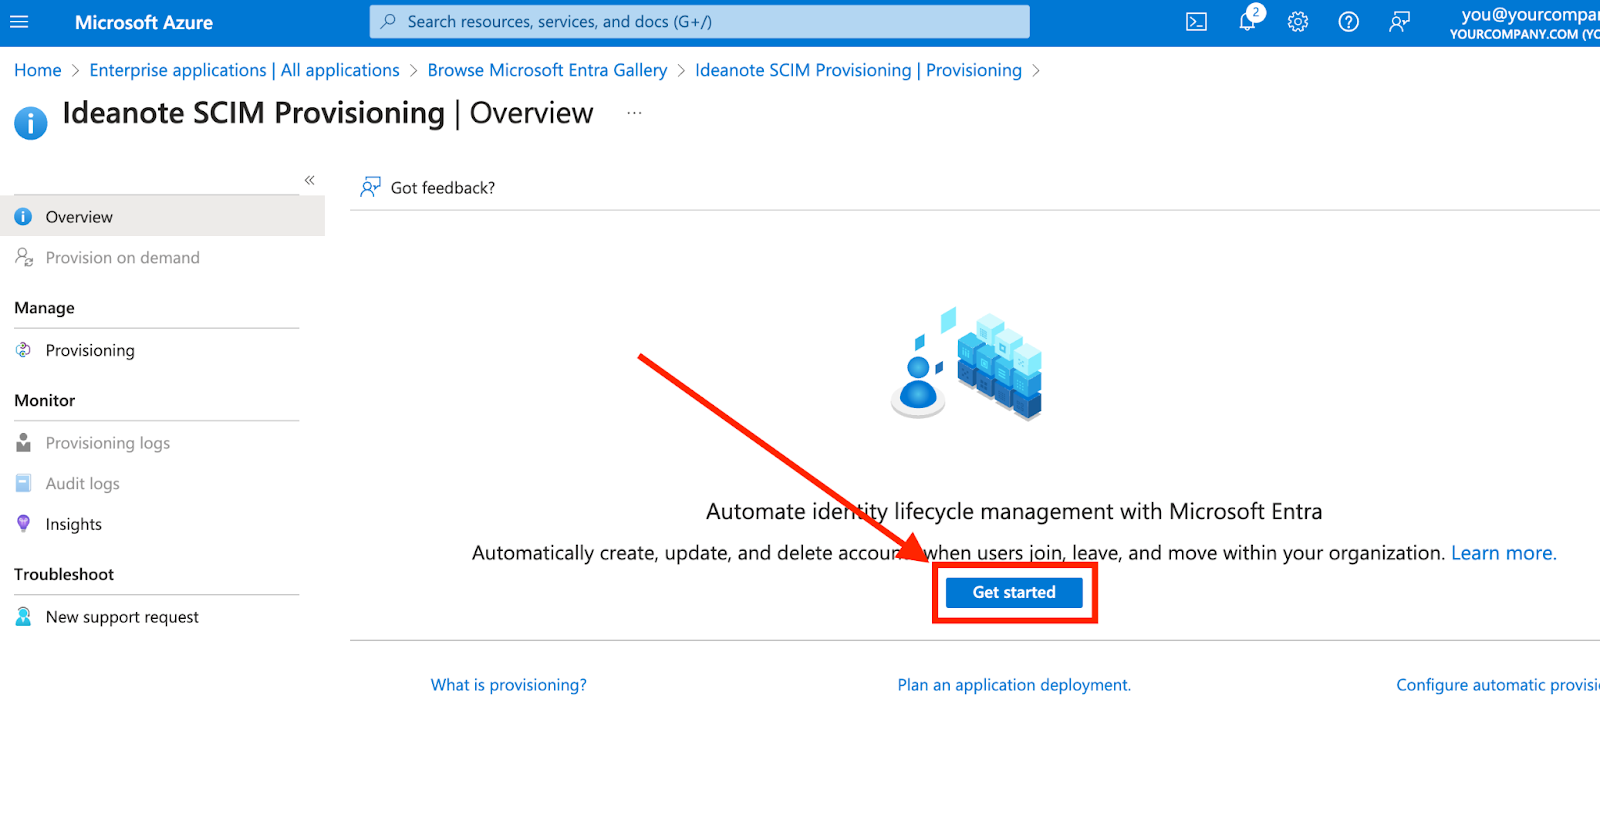
8) Cliquez sur « Commencez »
9) Nous devons maintenant connecter les informations de la configuration SCIM que vous avez configurée sur votre espace de travail Ideanote à votre application d'entreprise :

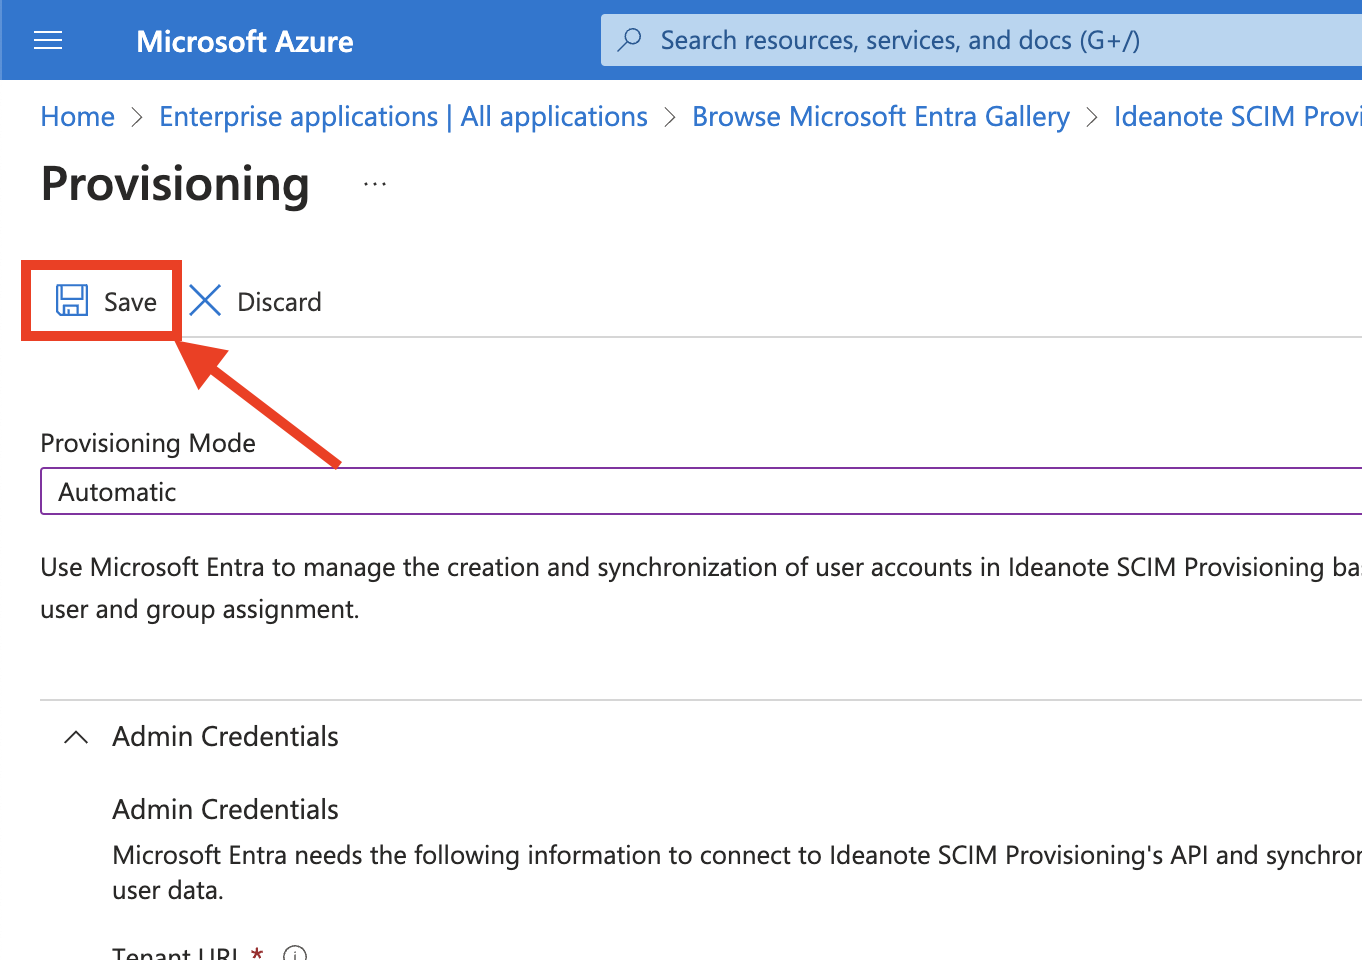
9.1) Moins « Mode d'approvisionnement », passez à « Automatique ». »Informations d'identification de l'administrateur » apparaîtra désormais en dessous. Assurez-vous qu'il est étendu.
9.2) Moins « URL du locataire », insérez l'URL que vous avez reçue à l'étape 2,2 dans la boîte de dialogue d'intégration SCIM de votre espace de travail Ideanote.
9.3) Moins « Jeton secret », insérez le jeton que vous avez reçu à l'étape 2,3 dans la boîte de dialogue d'intégration SCIM de votre espace de travail Ideanote.
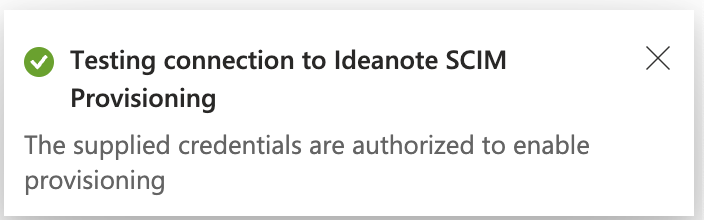
9.4) Enfin, cliquez sur « Tester la connexion » pour vous assurer qu'elle fonctionne correctement.
9.4.1) Si tout se passe correctement, le message suivant devrait s'afficher.
9.4.2) Vous devriez maintenant également pouvoir voir sur la configuration SCIM de votre espace de travail Ideanote que le texte et la couleur de l'indicateur décrit à l'étape 2.1 ont changé et ressemblent à ceux de l'image suivante :
9.5) Cliquez « Enregistrer » pour enregistrer les informations d'identification.
9.6) Vous devez maintenant revoir et éventuellement personnaliser la façon dont les données de vos utilisateurs et groupes sont mappées aux attributs SCIM correspondants :
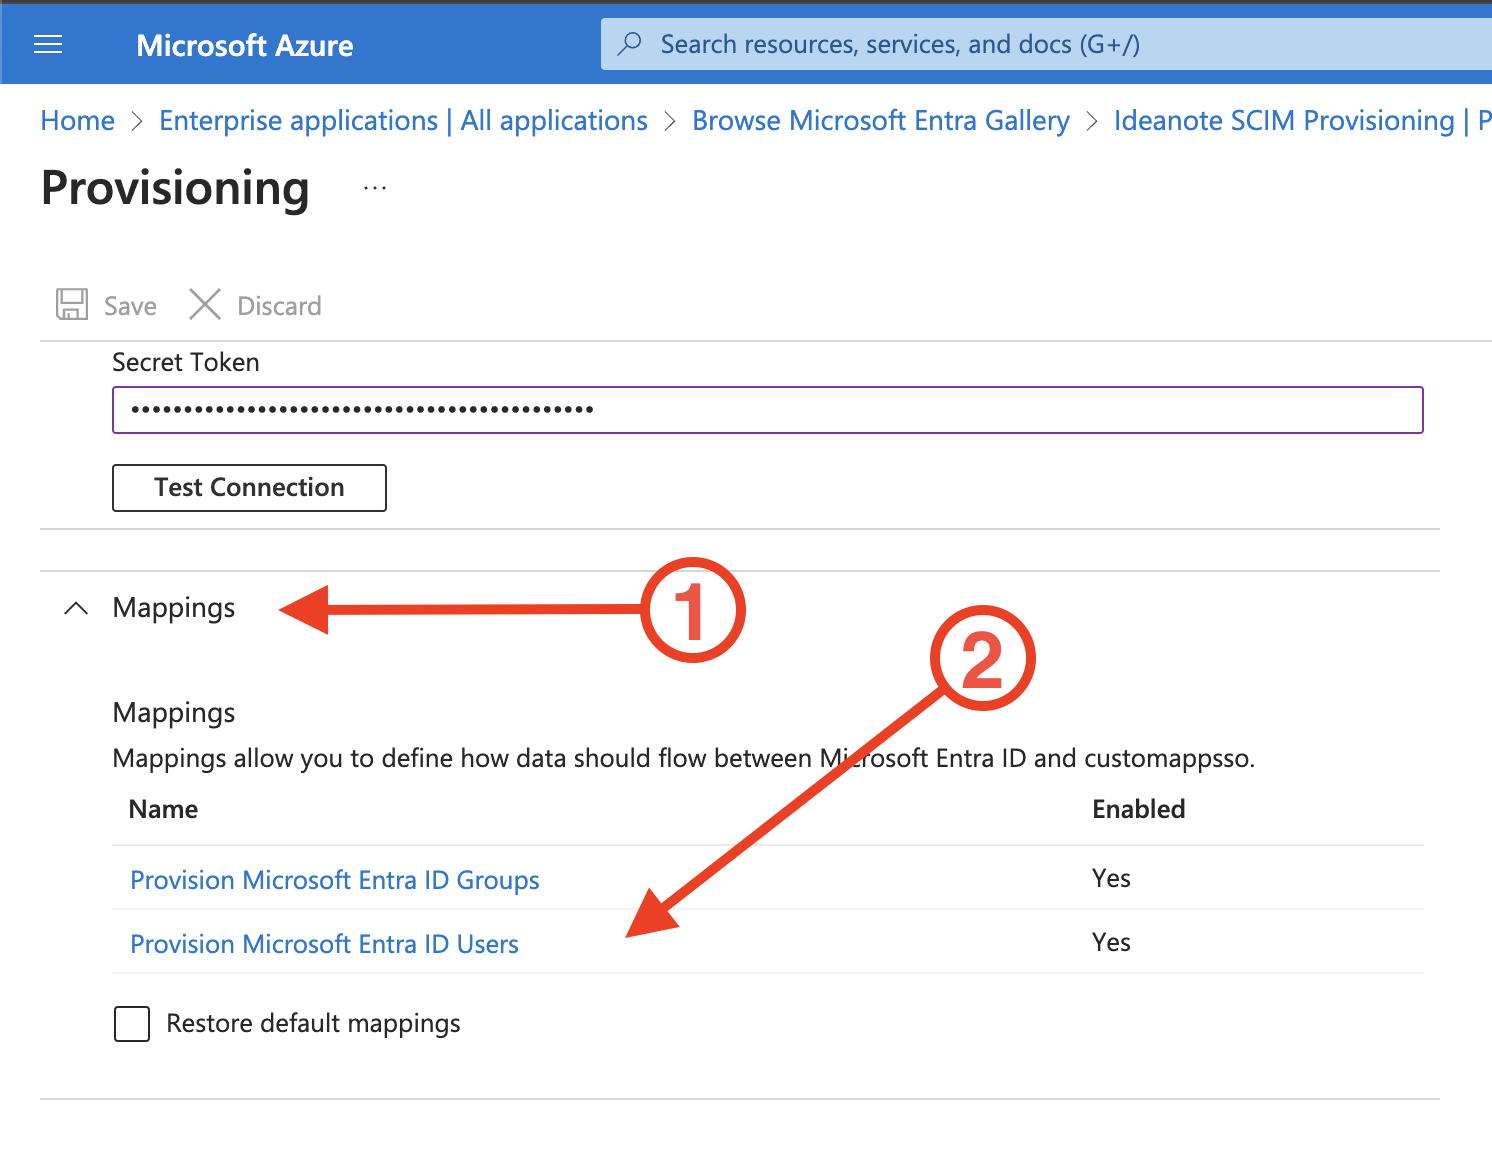
9.6.1) Assurez-vous que « Cartographies » le menu accordéon est étendu
9.6.2) Cliquez « Provisionner les utilisateurs de Microsoft Entra ID »
9.7) Vous allez maintenant être redirigé vers « Mappage des attributs ». Azure est fourni avec des mappages par défaut qui fonctionnent immédiatement, mais vous êtes libre de les personnaliser comme vous le souhaitez. Par exemple, vous souhaiterez peut-être associer les rôles spécifiques que vous attribuez à vos utilisateurs dans Entra ID à des rangs Ideanote équivalents, et/ou vous souhaiterez peut-être mapper autre chose que MailNickname à ExternalID, tel que le UserPrincipalName. Vous pouvez utiliser le tableau des « Attributs utilisateur pris en charge » décrit à l'étape 2,4 pour avoir un aperçu des attributs utilisateur pris en charge par Ideanote.

9.7.1) Si vous souhaitez mapper à l'un des attributs d'extension de schéma utilisateur d'Ideanote, tel que TeamPath, vous devez l'ajouter à la liste des attributs de l'application Enterprise :

9.7.1.1) Assurez-vous « Afficher les options avancées » est coché
9.7.1.2) Cliquez « Modifier la liste d'attributs pour customappsso » (ou quel que soit le nom de l'application)
9.7.1.3) Faites défiler la page vers le bas et saisissez le nom de l'attribut auquel vous souhaitez mapper, par exemple URN:IETF:Params:Scim:Schemas:Extension:IdeaNote:2.0:User:TeamPath

9.7.1.4) Cliquez sur « Enregistrer » pour valider vos modifications
9.7.2) Si vous souhaitez ajouter un mappage supplémentaire, cliquez sur « Ajouter un nouveau mappage ». Vous pouvez consulter la documentation complète de Microsoft sur le mappage des attributs ici.

9.8) Vous êtes maintenant prêt à ajouter les utilisateurs et les groupes que vous souhaitez associer à Ideanote et mettre à disposition avec SCIM.
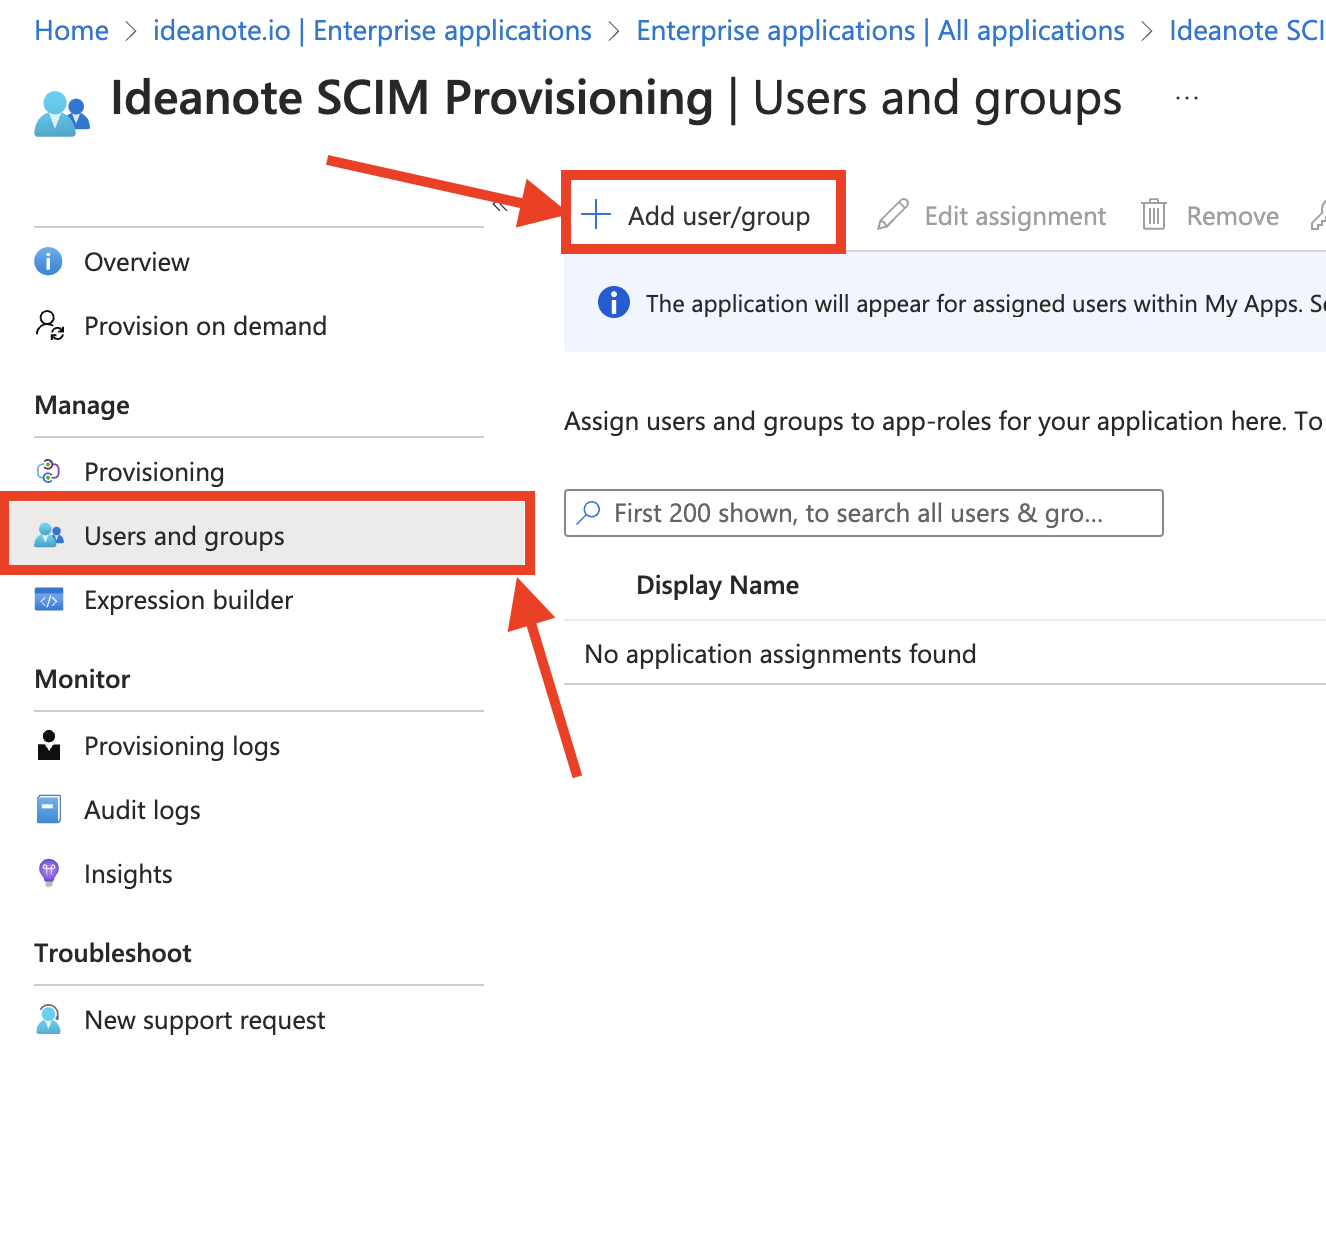
9.8.1) Cliquez « Utilisateurs et groupes »
9.8.2) Cliquez « Ajouter un utilisateur/un groupe »
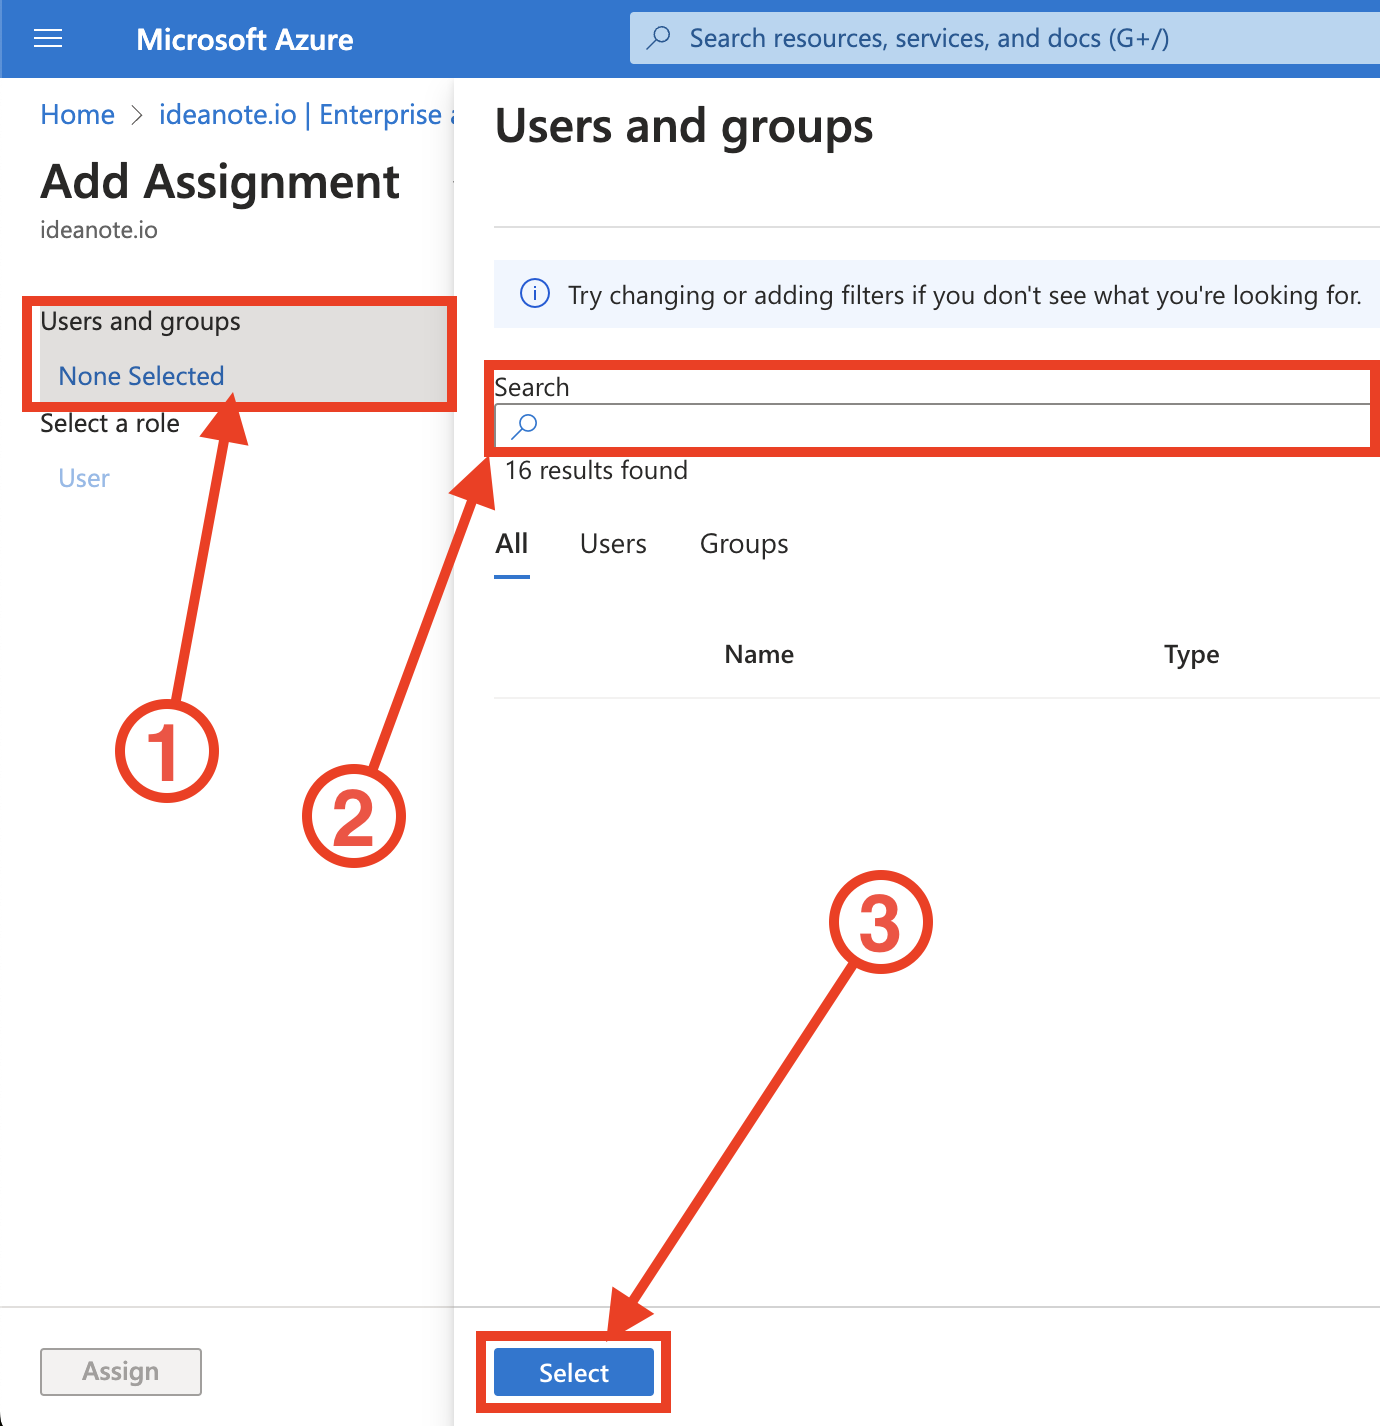
9.8.2.1) Sous « Utilisateurs et groupes », cliquez « Aucun sélectionné »
9.8.2.2) Recherchez les utilisateurs et/ou les groupes que vous souhaitez ajouter.
9.8.2.3) Cliquez « Sélectionner » pour ajouter les utilisateurs sélectionnés à l'application.
9.9) Vous avez maintenant configuré le provisionnement SCIM avec succès ! Microsoft Entra ID approvisionnera automatiquement vos utilisateurs et vos groupes à intervalles fixes. Si vous souhaitez d'abord tester ce provisionnement, vous pouvez provisionner un utilisateur ou un groupe à la demande :

9.9.1) Cliquez « Fourniture à la demande »
9.9.2) Sous « Utilisateur sélectionné », recherchez l'utilisateur ou le groupe que vous souhaitez approvisionner
9.9.3) Cliquez « Provision » pour fournir à l'utilisateur
9.9.4) Si vous avez sélectionné un utilisateur, celui-ci devrait maintenant apparaître dans la page des paramètres « Personnes » de votre espace de travail Ideanote. Si vous avez sélectionné un groupe, il devrait maintenant apparaître en tant qu'équipe dans l'onglet « Équipes ».
9.10) Vous avez maintenant configuré SCIM avec succès et configuré votre premier utilisateur !
9.11) Vous pouvez voir quand un utilisateur a été synchronisé pour la dernière fois avec SCIM, ainsi que son identifiant externe, sur la page des paramètres « Personnes » de votre espace de travail Ideanote :

9.11.1) Accédez à la colonne visible la plus à droite du tableau et cliquez sur les trois points horizontaux (...)
9.11.2) Assurez-vous que »Synchronisé avec SCIM à ' et/ou « Identifiant externe SCIM » est cochée pour qu'ils apparaissent dans le tableau.
9.12) Microsoft Entra ID se chargera de synchroniser les modifications apportées à Ideanote au fil du temps à intervalles fixes. Lorsque vous supprimez un utilisateur d'Entra ID, il est également supprimé de votre espace de travail Ideanote. Quand tu annuler l'attribution un utilisateur de l'application d'entreprise que vous avez créée pour le provisionnement SCIM, l'utilisateur sera à la place handicapé dans Ideanote. Ceci est régi par les règles décrites par Microsoft dans cet article dans la section « Événements de déprovisionnement ».